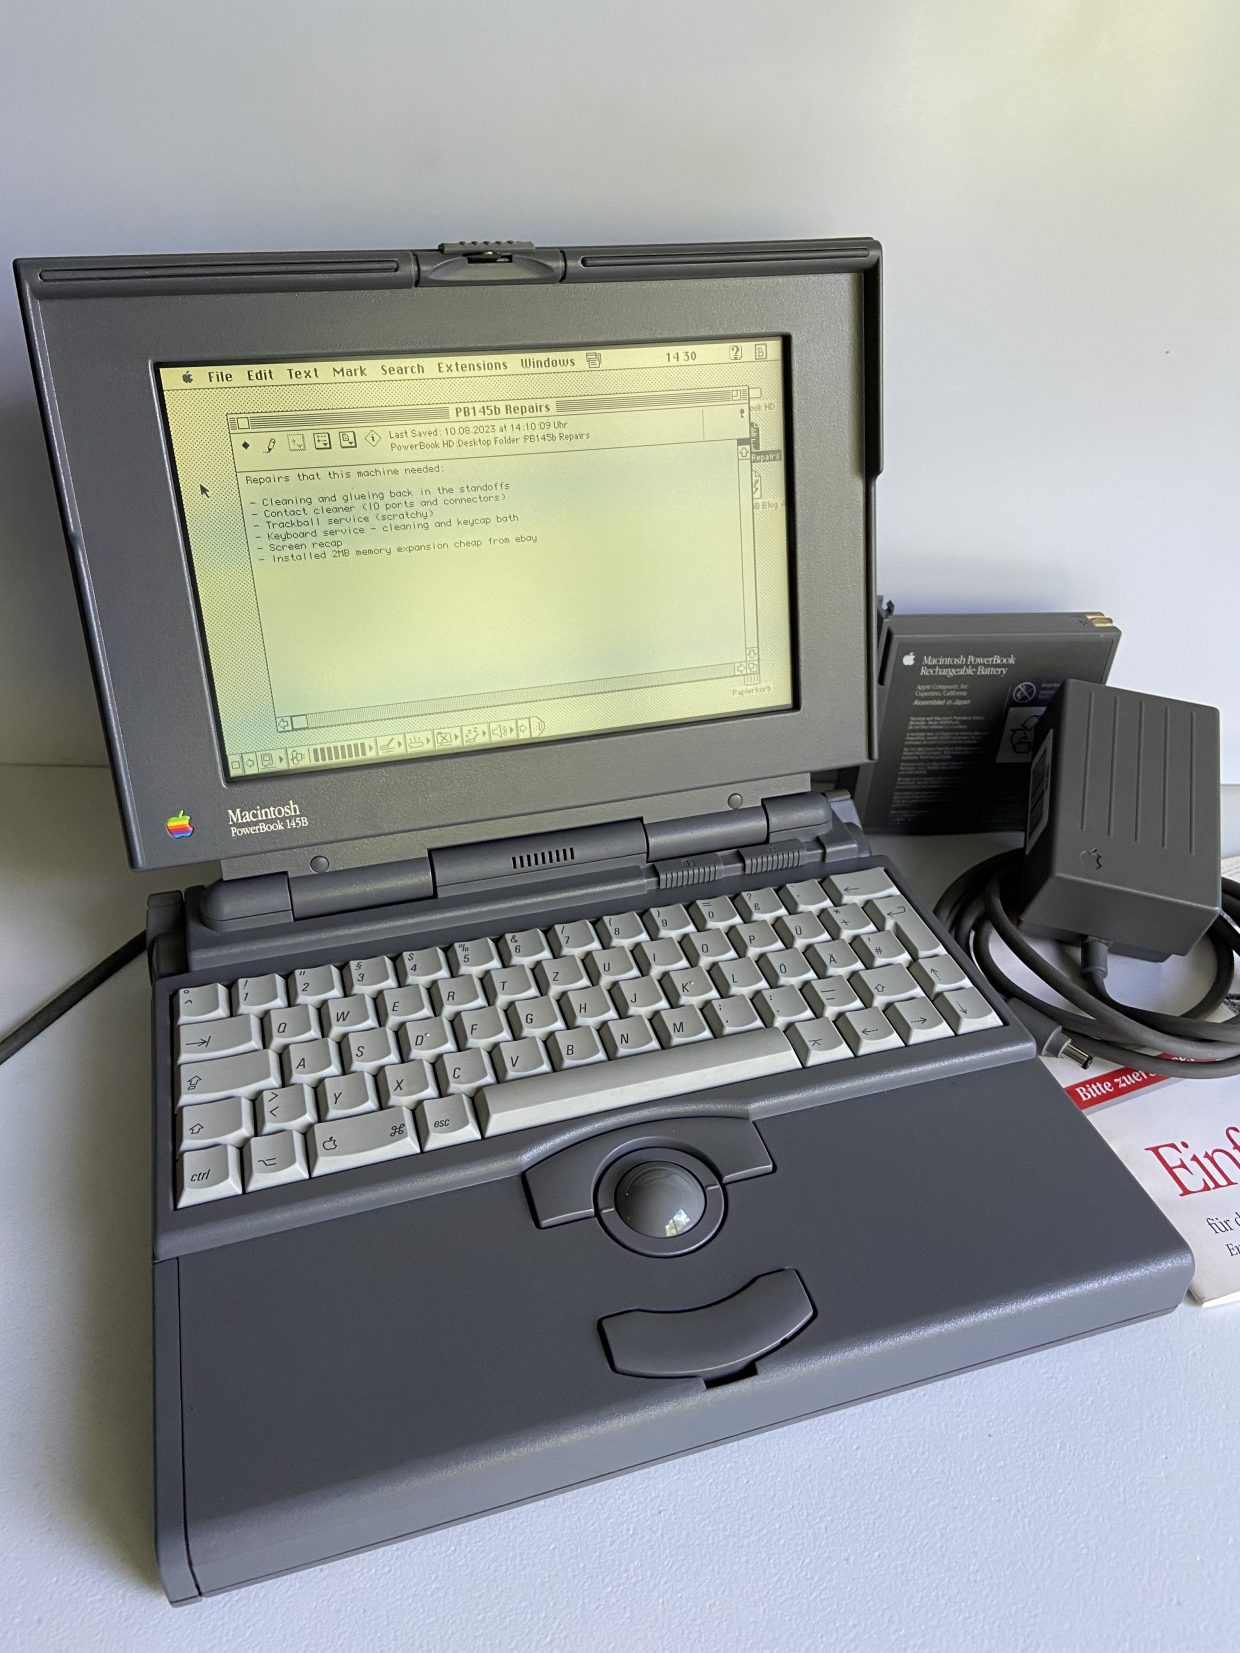
I got hold of an early Apple PowerBook really cheap from ebay as an restoration object. The PowerBook 145B is a refresh of the second line of Apple notebooks (145, 160, 180) that followed the initial 100 series machines after the Mac Portable.
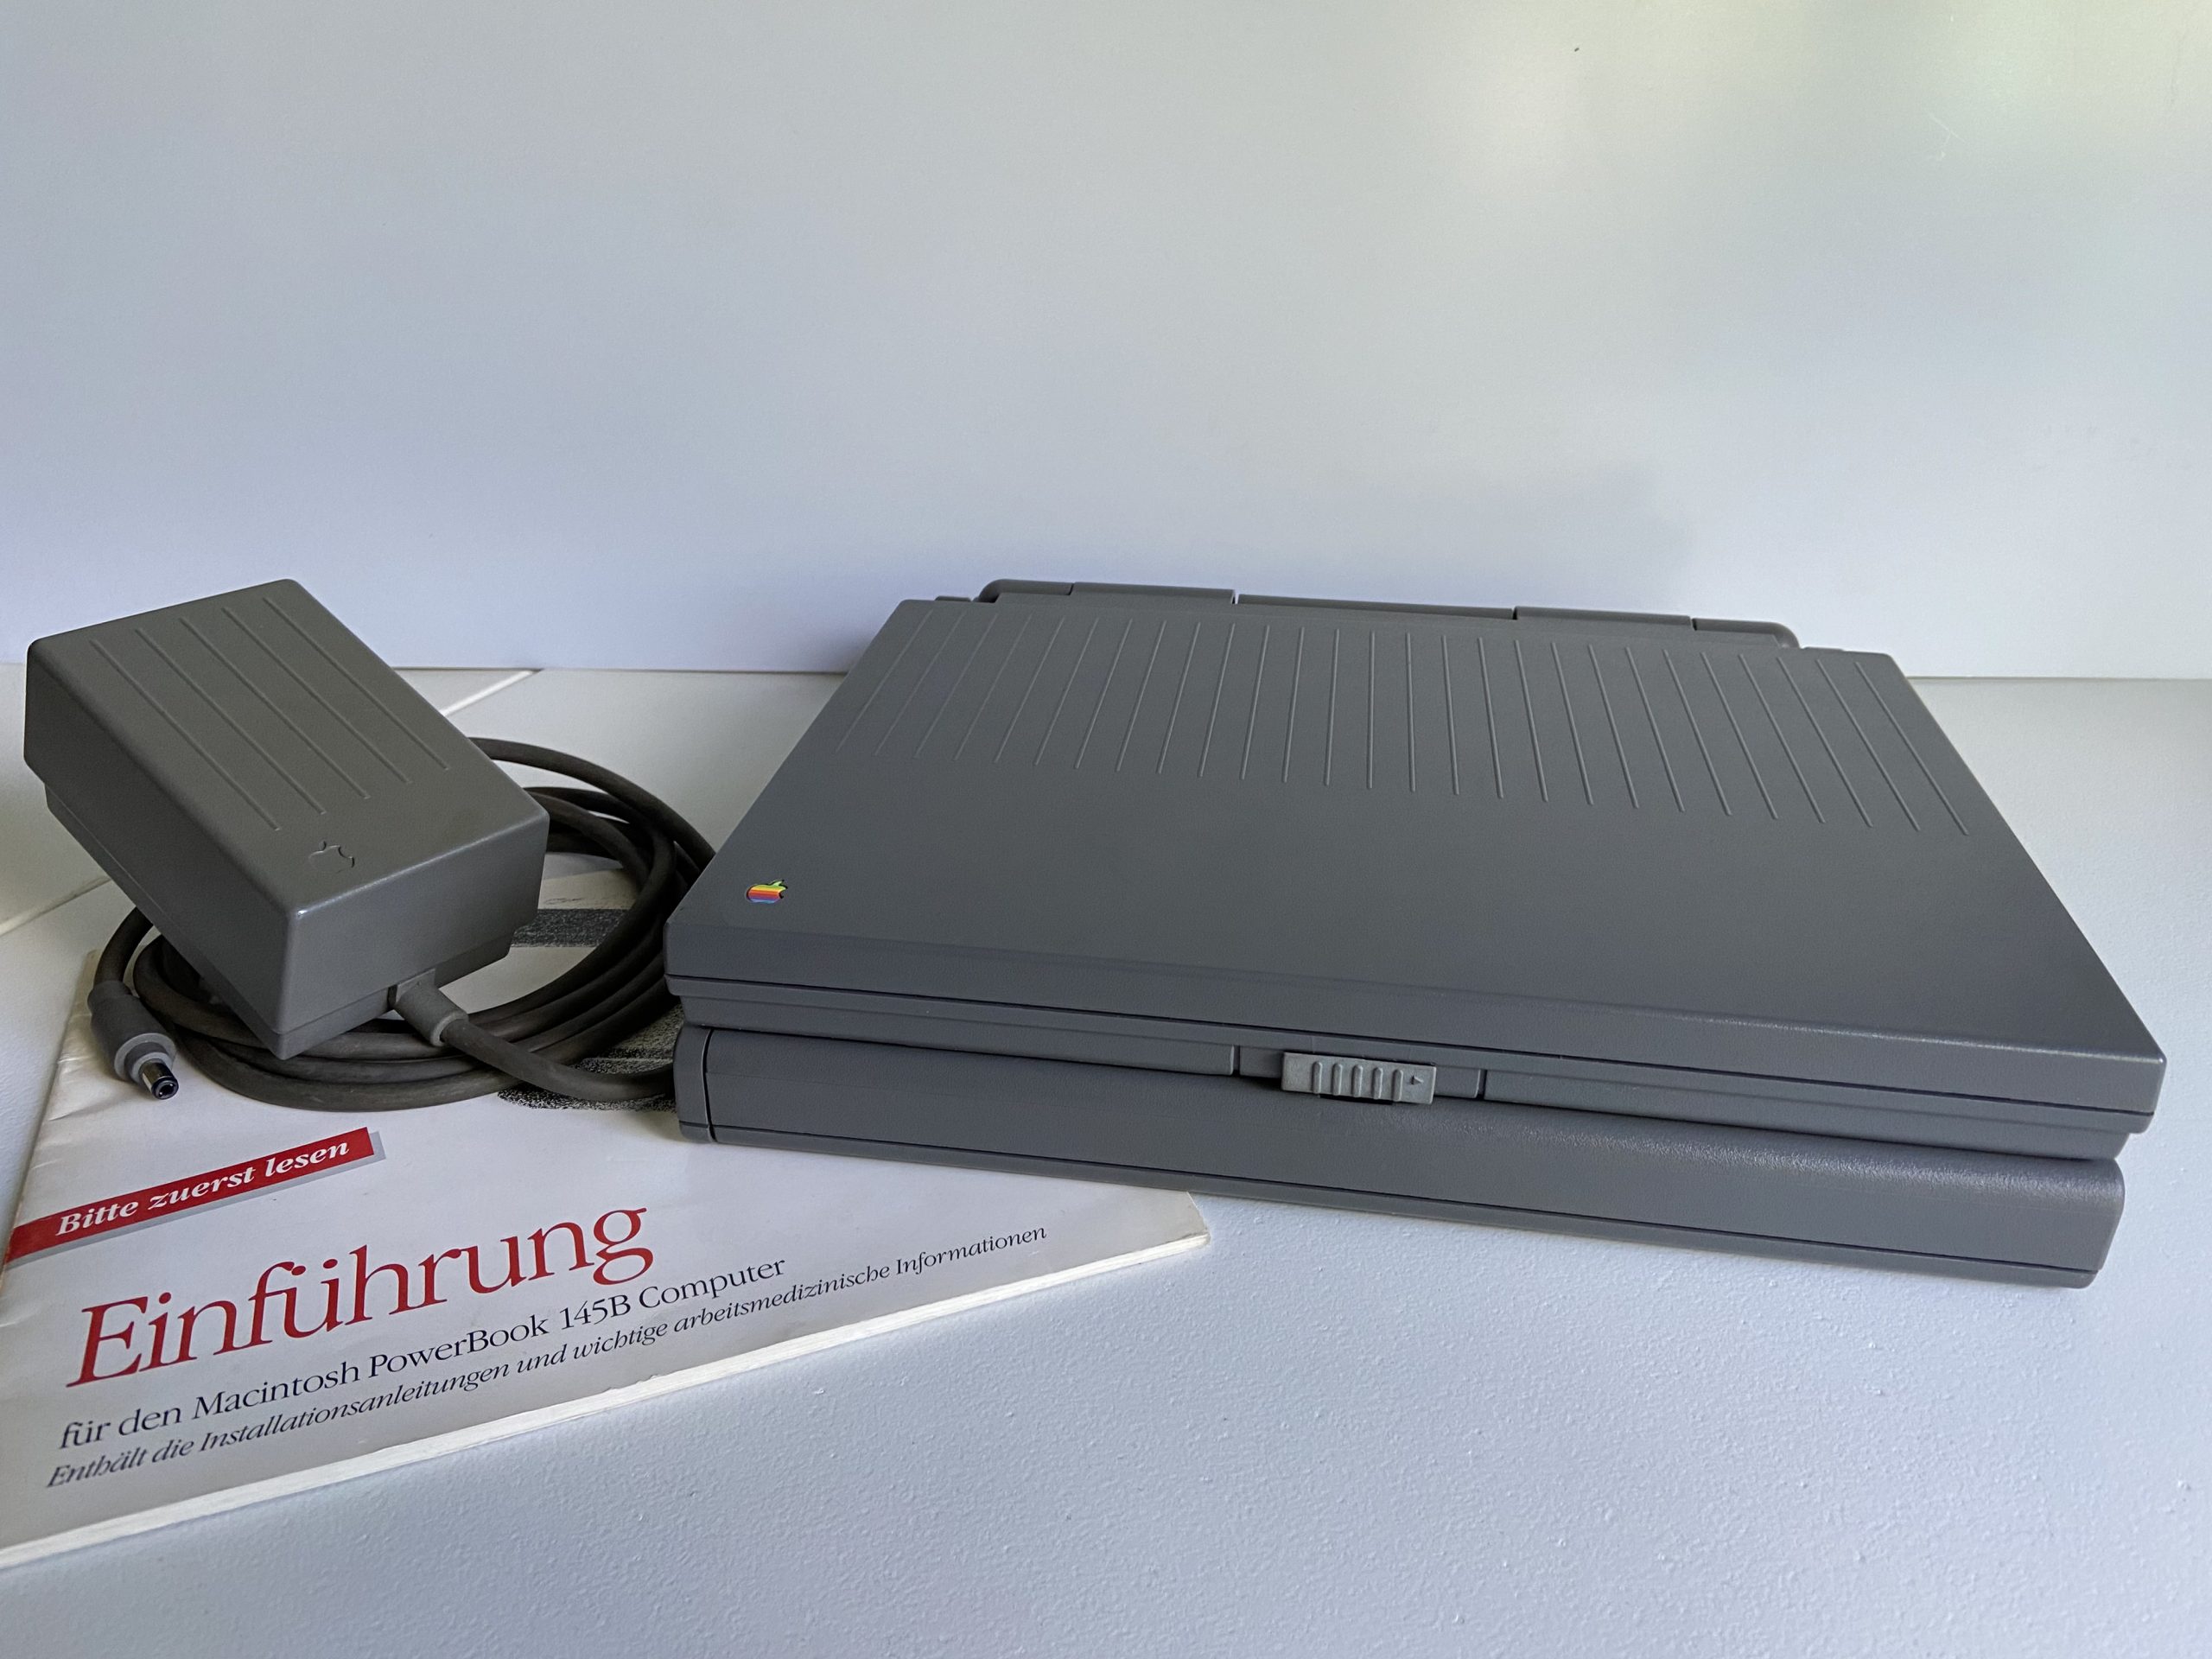
The PowerBook 145 and its cost reduced successor model 145B marked the entry line of Apple notebooks in 1993. This machine competed with the IBM ThinkPad 350 and similar offerings from Compaq and Toshiba of the time.
Restoration
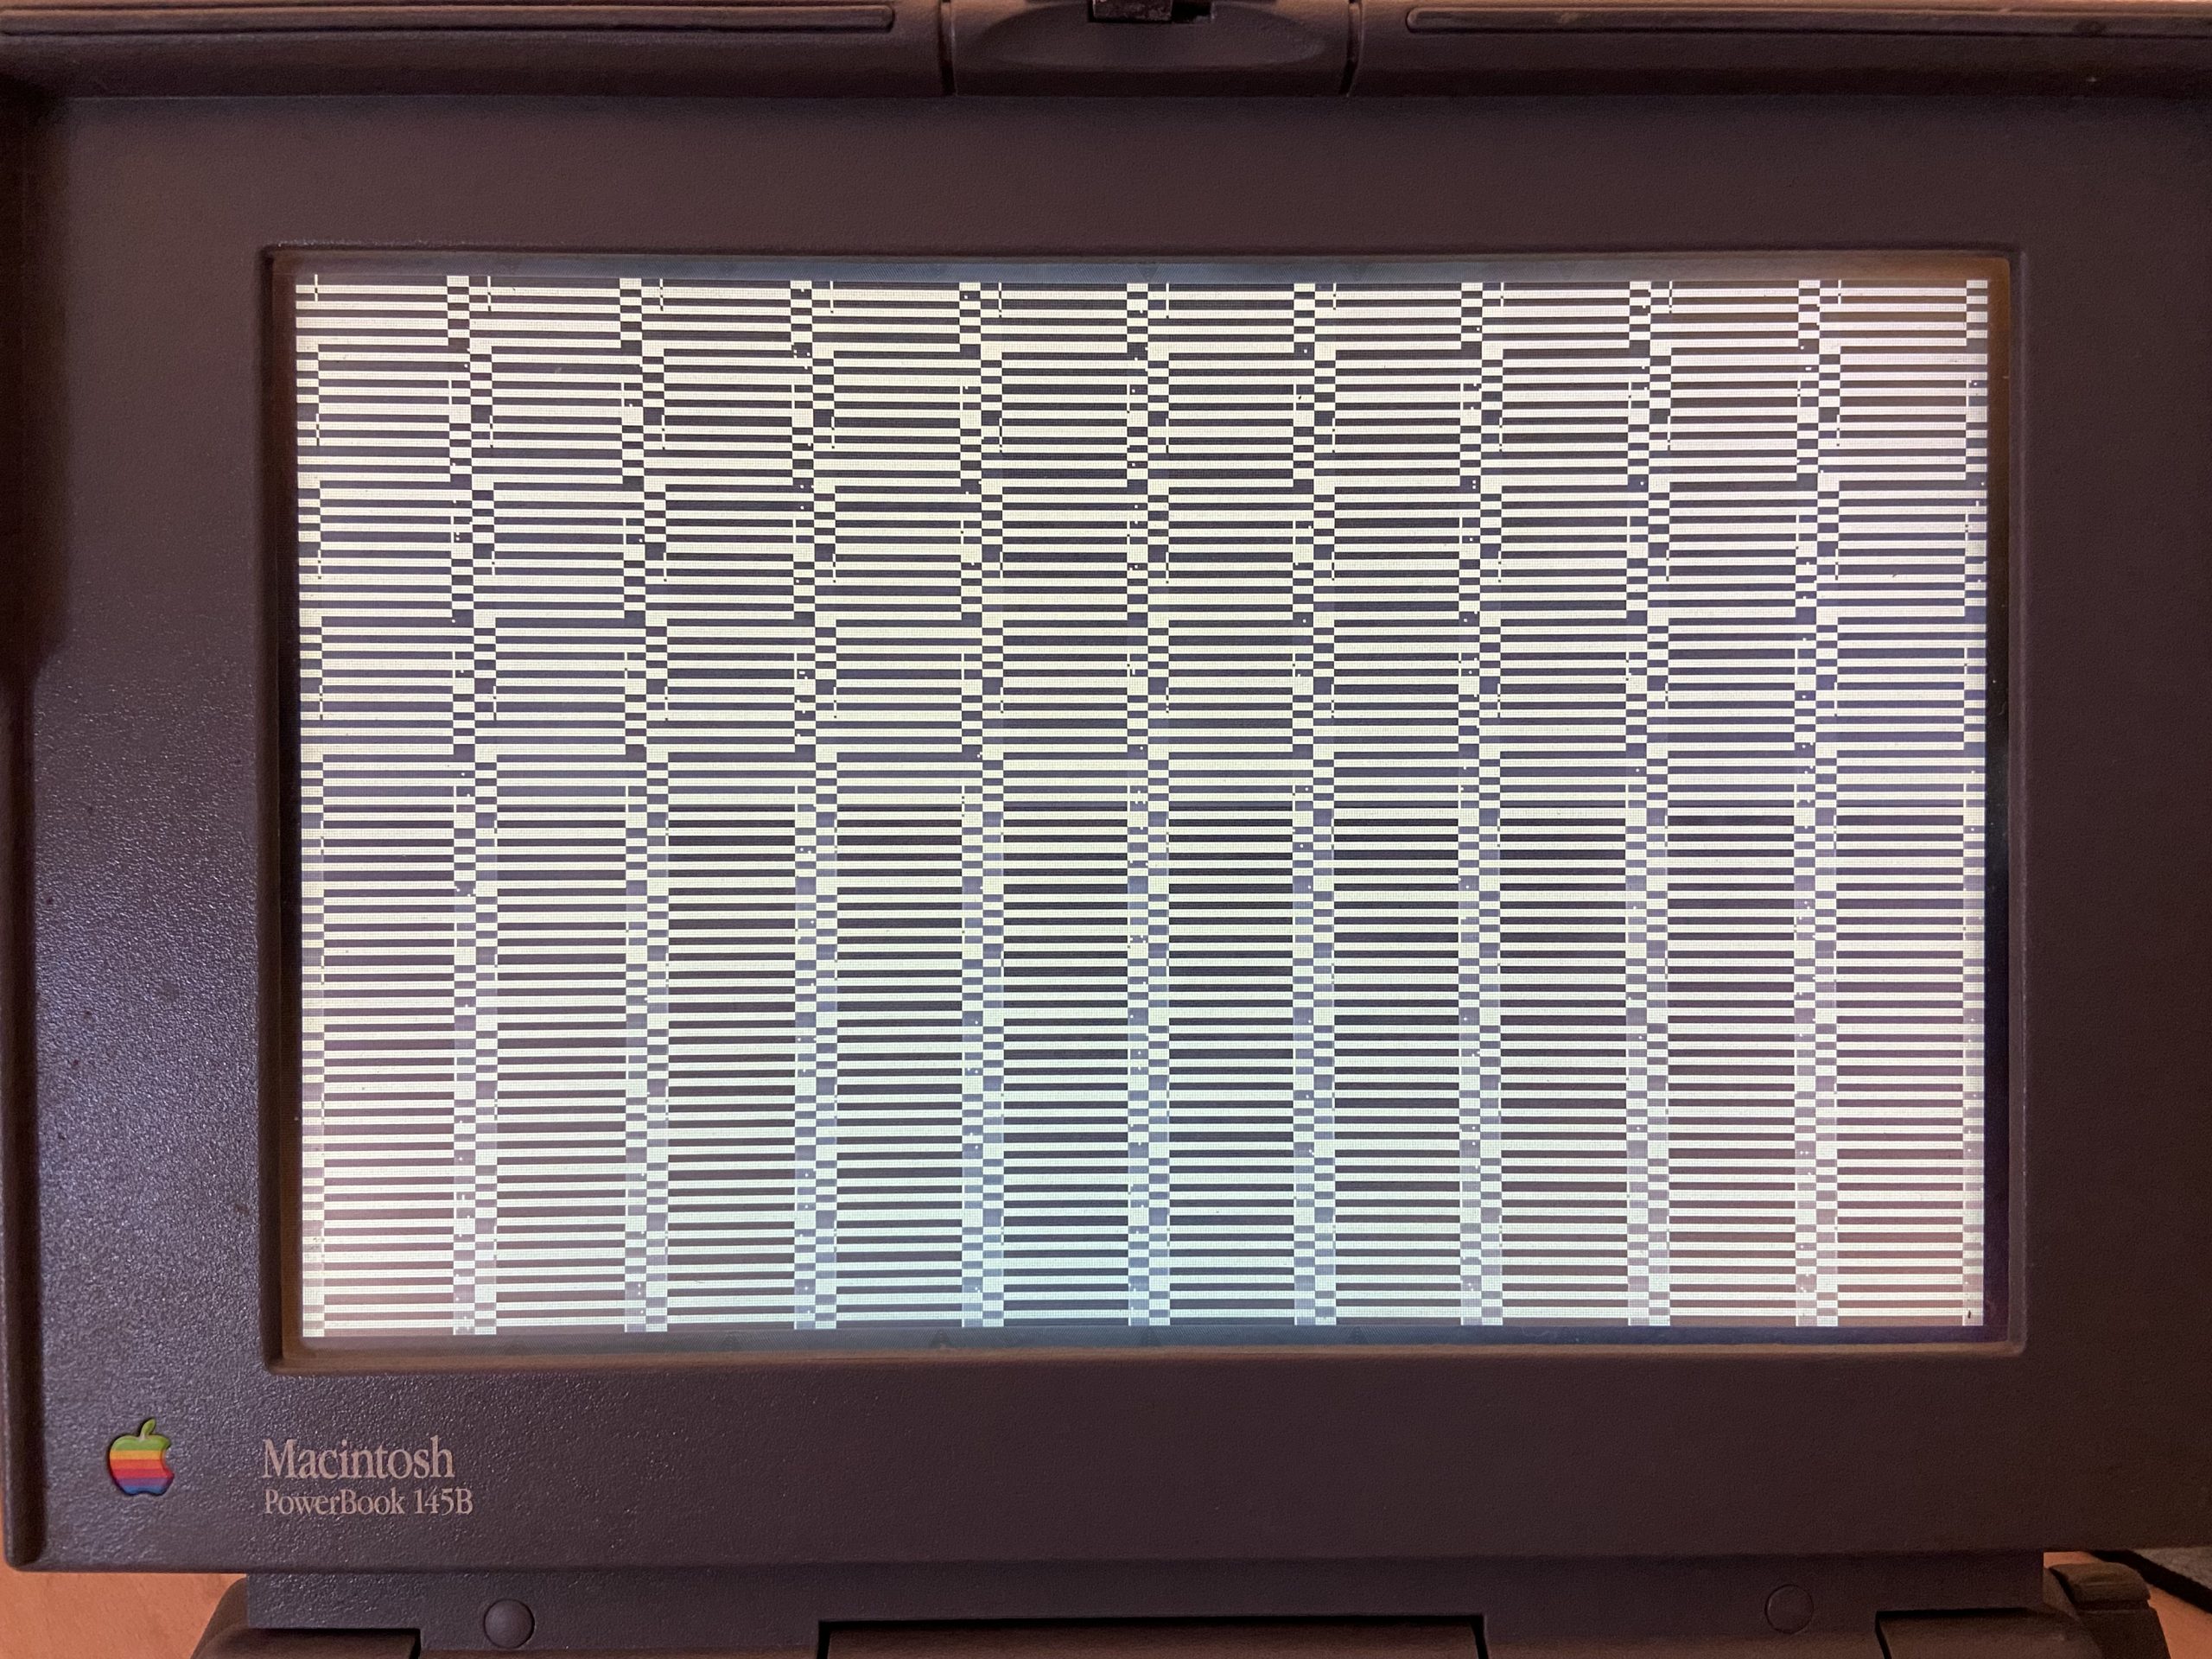
When I first met this machine, it powered up but did not boot although the screen lit up and the harddisk spun up. Playing with the brightness and contrast revealed a garbled image only. It did make the classic Macintosh „bong“ sound followed by a 8-tone chime that pointed to some hardware defect.
Cleaning up battery leakage
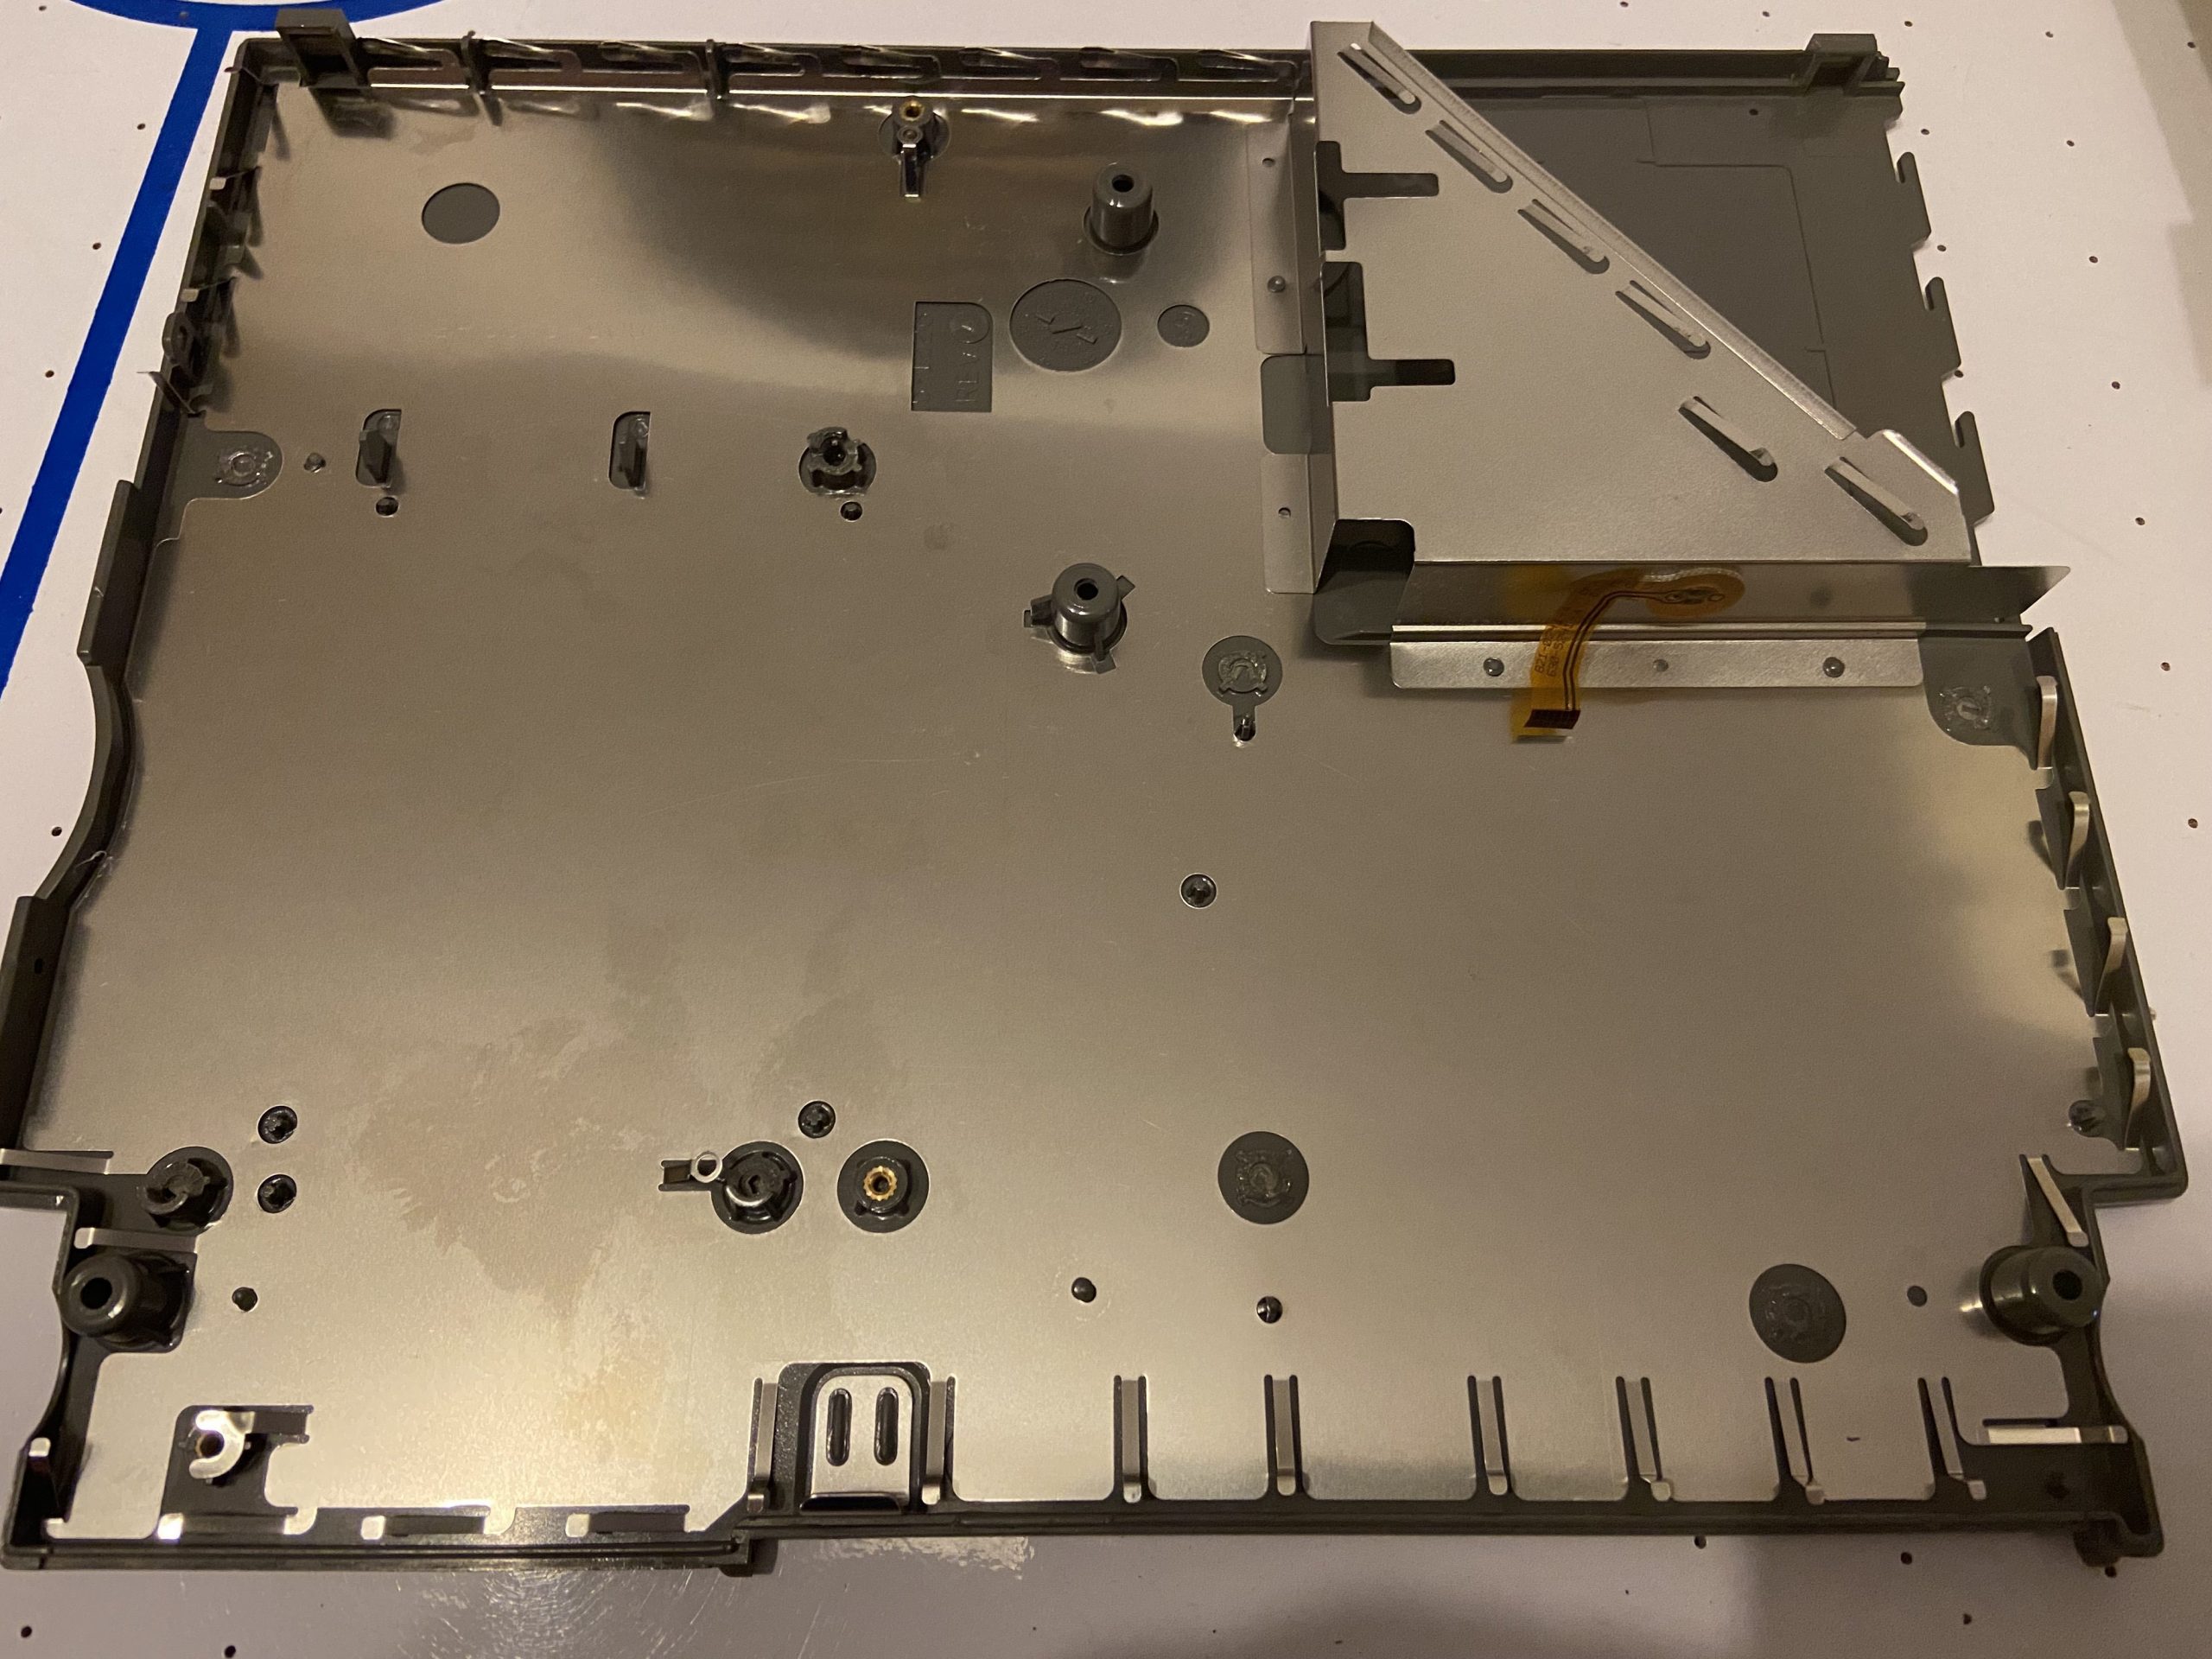
Opening the machine revealed a rather unpleasant surprise – the battery had leaked its fluids into the machine which bottom was covered with blueish crustations. More surprisingly though the fluid had stayed on the bottom and not reached the floppy or the harddrive and even the electronics boards were in good shape still. One trace on the base logic-board in the area where the battery connector is had corroded away. This was quickly fixed by running a bodge wire.
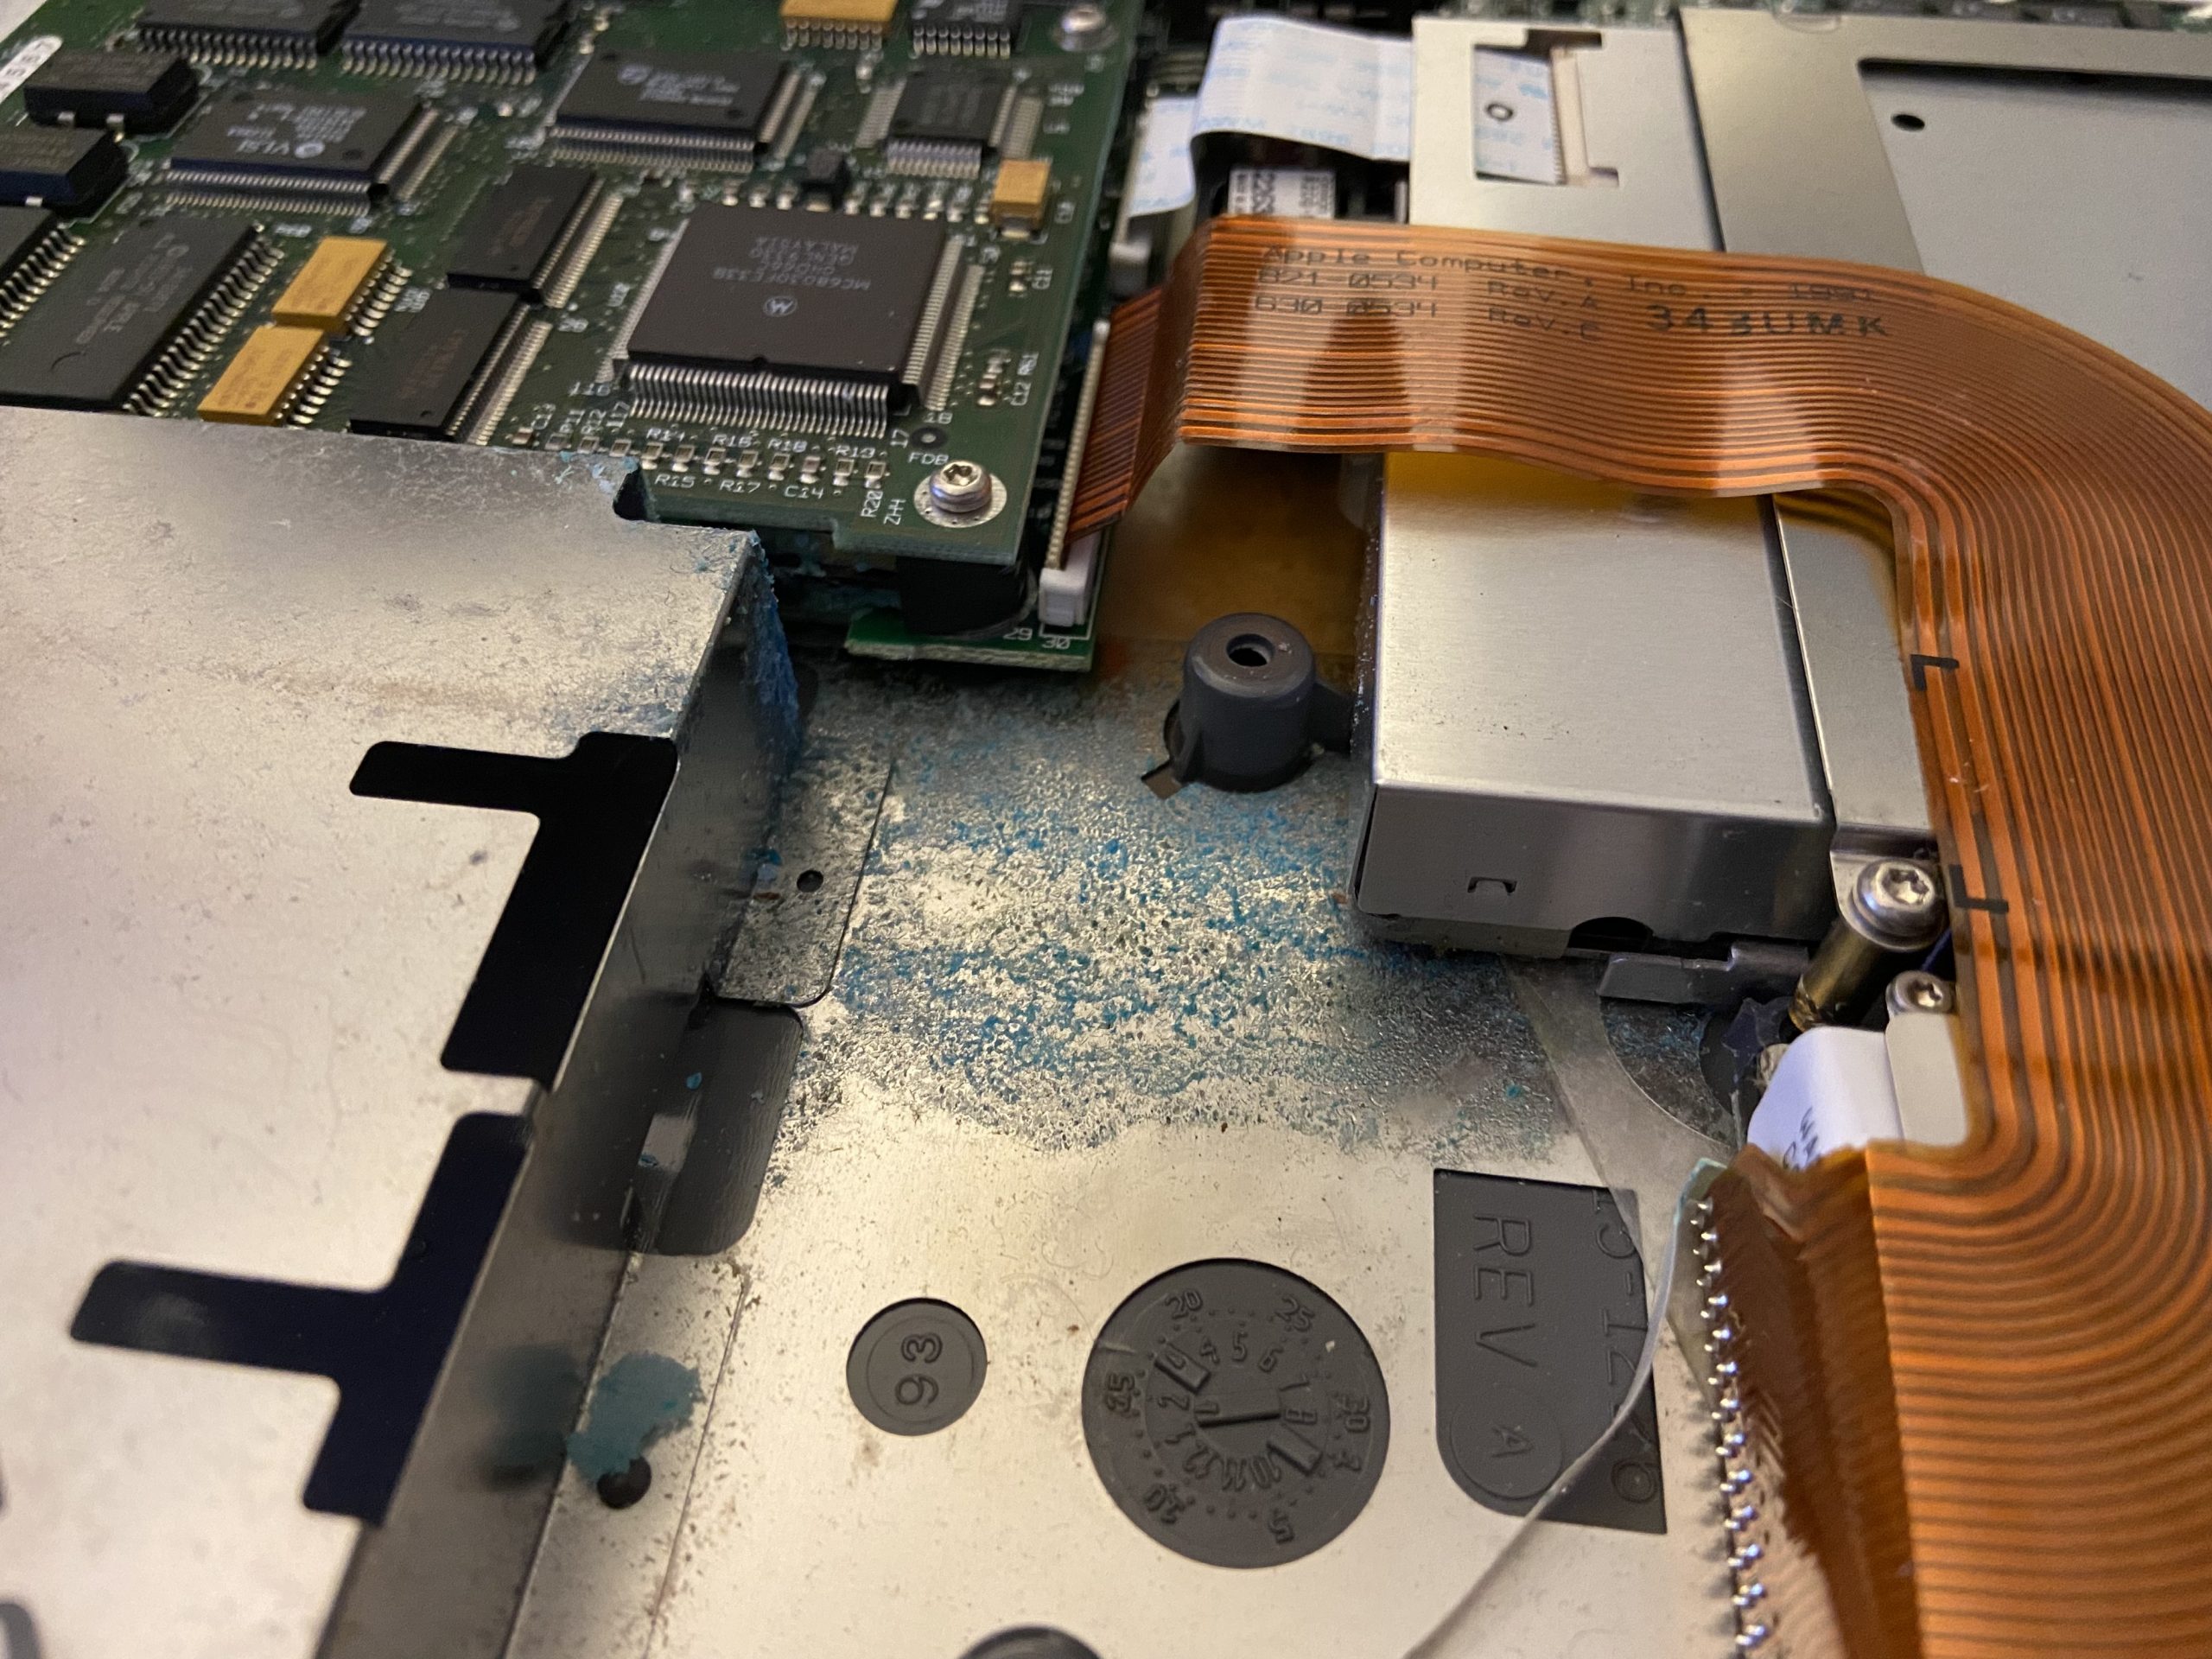
At this point, everything had to be taken apart so that the leak could be cleaned up. Turns out that white vinegar can do wonders, the bottom came out shiny as new.
Fixing broken plastics
Plastics don’t age well and this is particularly true for this machine type. The components are held in place by pegs on the bottom case part. Each peg protrudes a couple of millimeters from the bottom and holds a brass insert at its top which is the counterpart to a screw fixing some component from the top. As time passes, the plastics become brittle and start to just crumble away leaving a loose component and the brass insert behind.
In this case, most of the plastics were still inside the case, lying loosely on the case bottom. I glued them back onto their original positions trying something new called Bondic which is a UV curing resin. I found it easy to use – squeeze a bit from the tube then apply UV light from a small LED and the stuff hardens in a matter of seconds. I so managed to glue the standoffs back in and to carefully attach the components. How long this will hold remains to be seen.
Recapping monitor
Next up, I decided to recap the LCD panel, hoping this would fix the garbled screen and give some more insight into what was going on. I was actually hoping for something like a readable error message. Unfortunately, this was not the case as the problem was with the CPU daughter-card being defective as I later learned. Still, the screen gained clarity, less ghosting and front and foremost a stable image regardless of what the content was – before it changed brightness all over the place depending on screen content.

Keyboard service
The keyboard was in really filthy condition, so the only solution was to extract it, take it apart and give the keycaps a good ultrasonic bath while removing dust and plastic crumbles from the rest of the assembly.
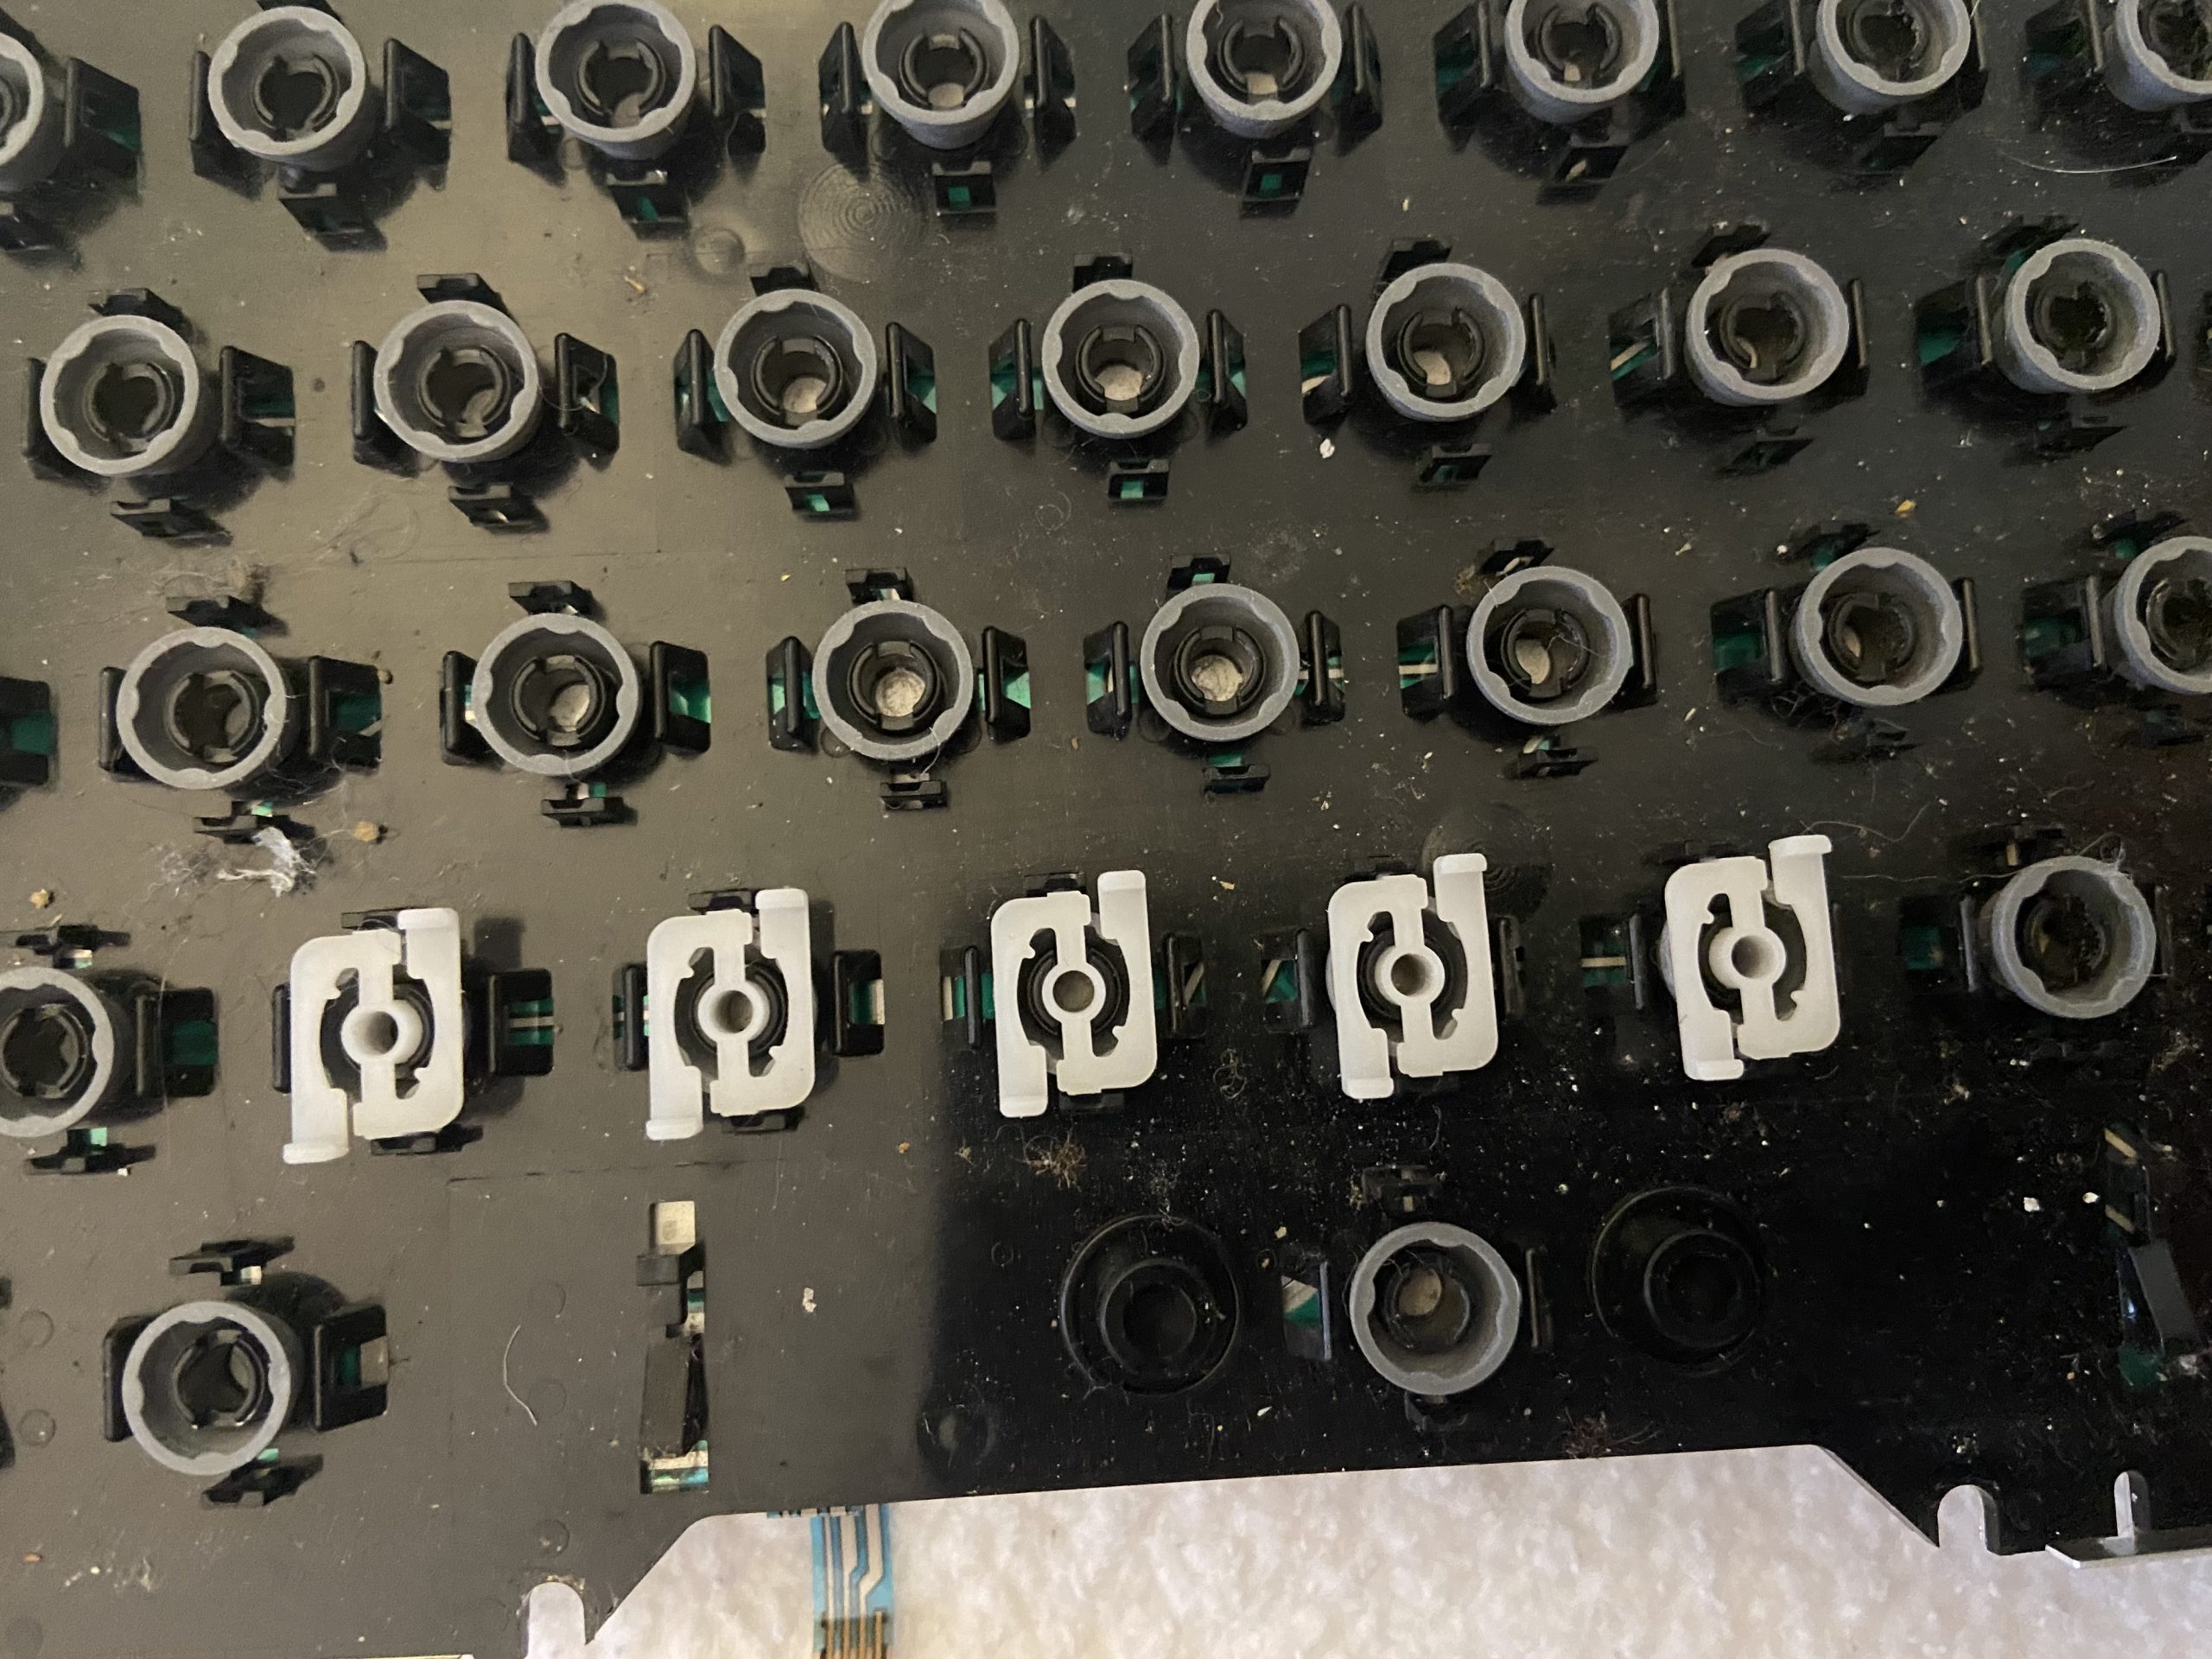
The key mechanism is actually interesting, its somewhere between the IBM L40sx membrane keyboard and todays 5 EUR simple ass keyboards. Each key consists of three parts that sit on top of a barrel on the baseplate. The keycap engages with the barrel, limiting its travel up.
Beneath is a white, springy part with a plunger in the middle that pushes through the barrel down on the contact foil and that likely is the linear force pressing the keycap upward. A silicone membrane sits under the white part and is what I guess gives a little tactility.
Still, the keyboard does not feel pleasant to type on due to the relatively undefined trigger point which is not the same as when the tactile feedback occurs.
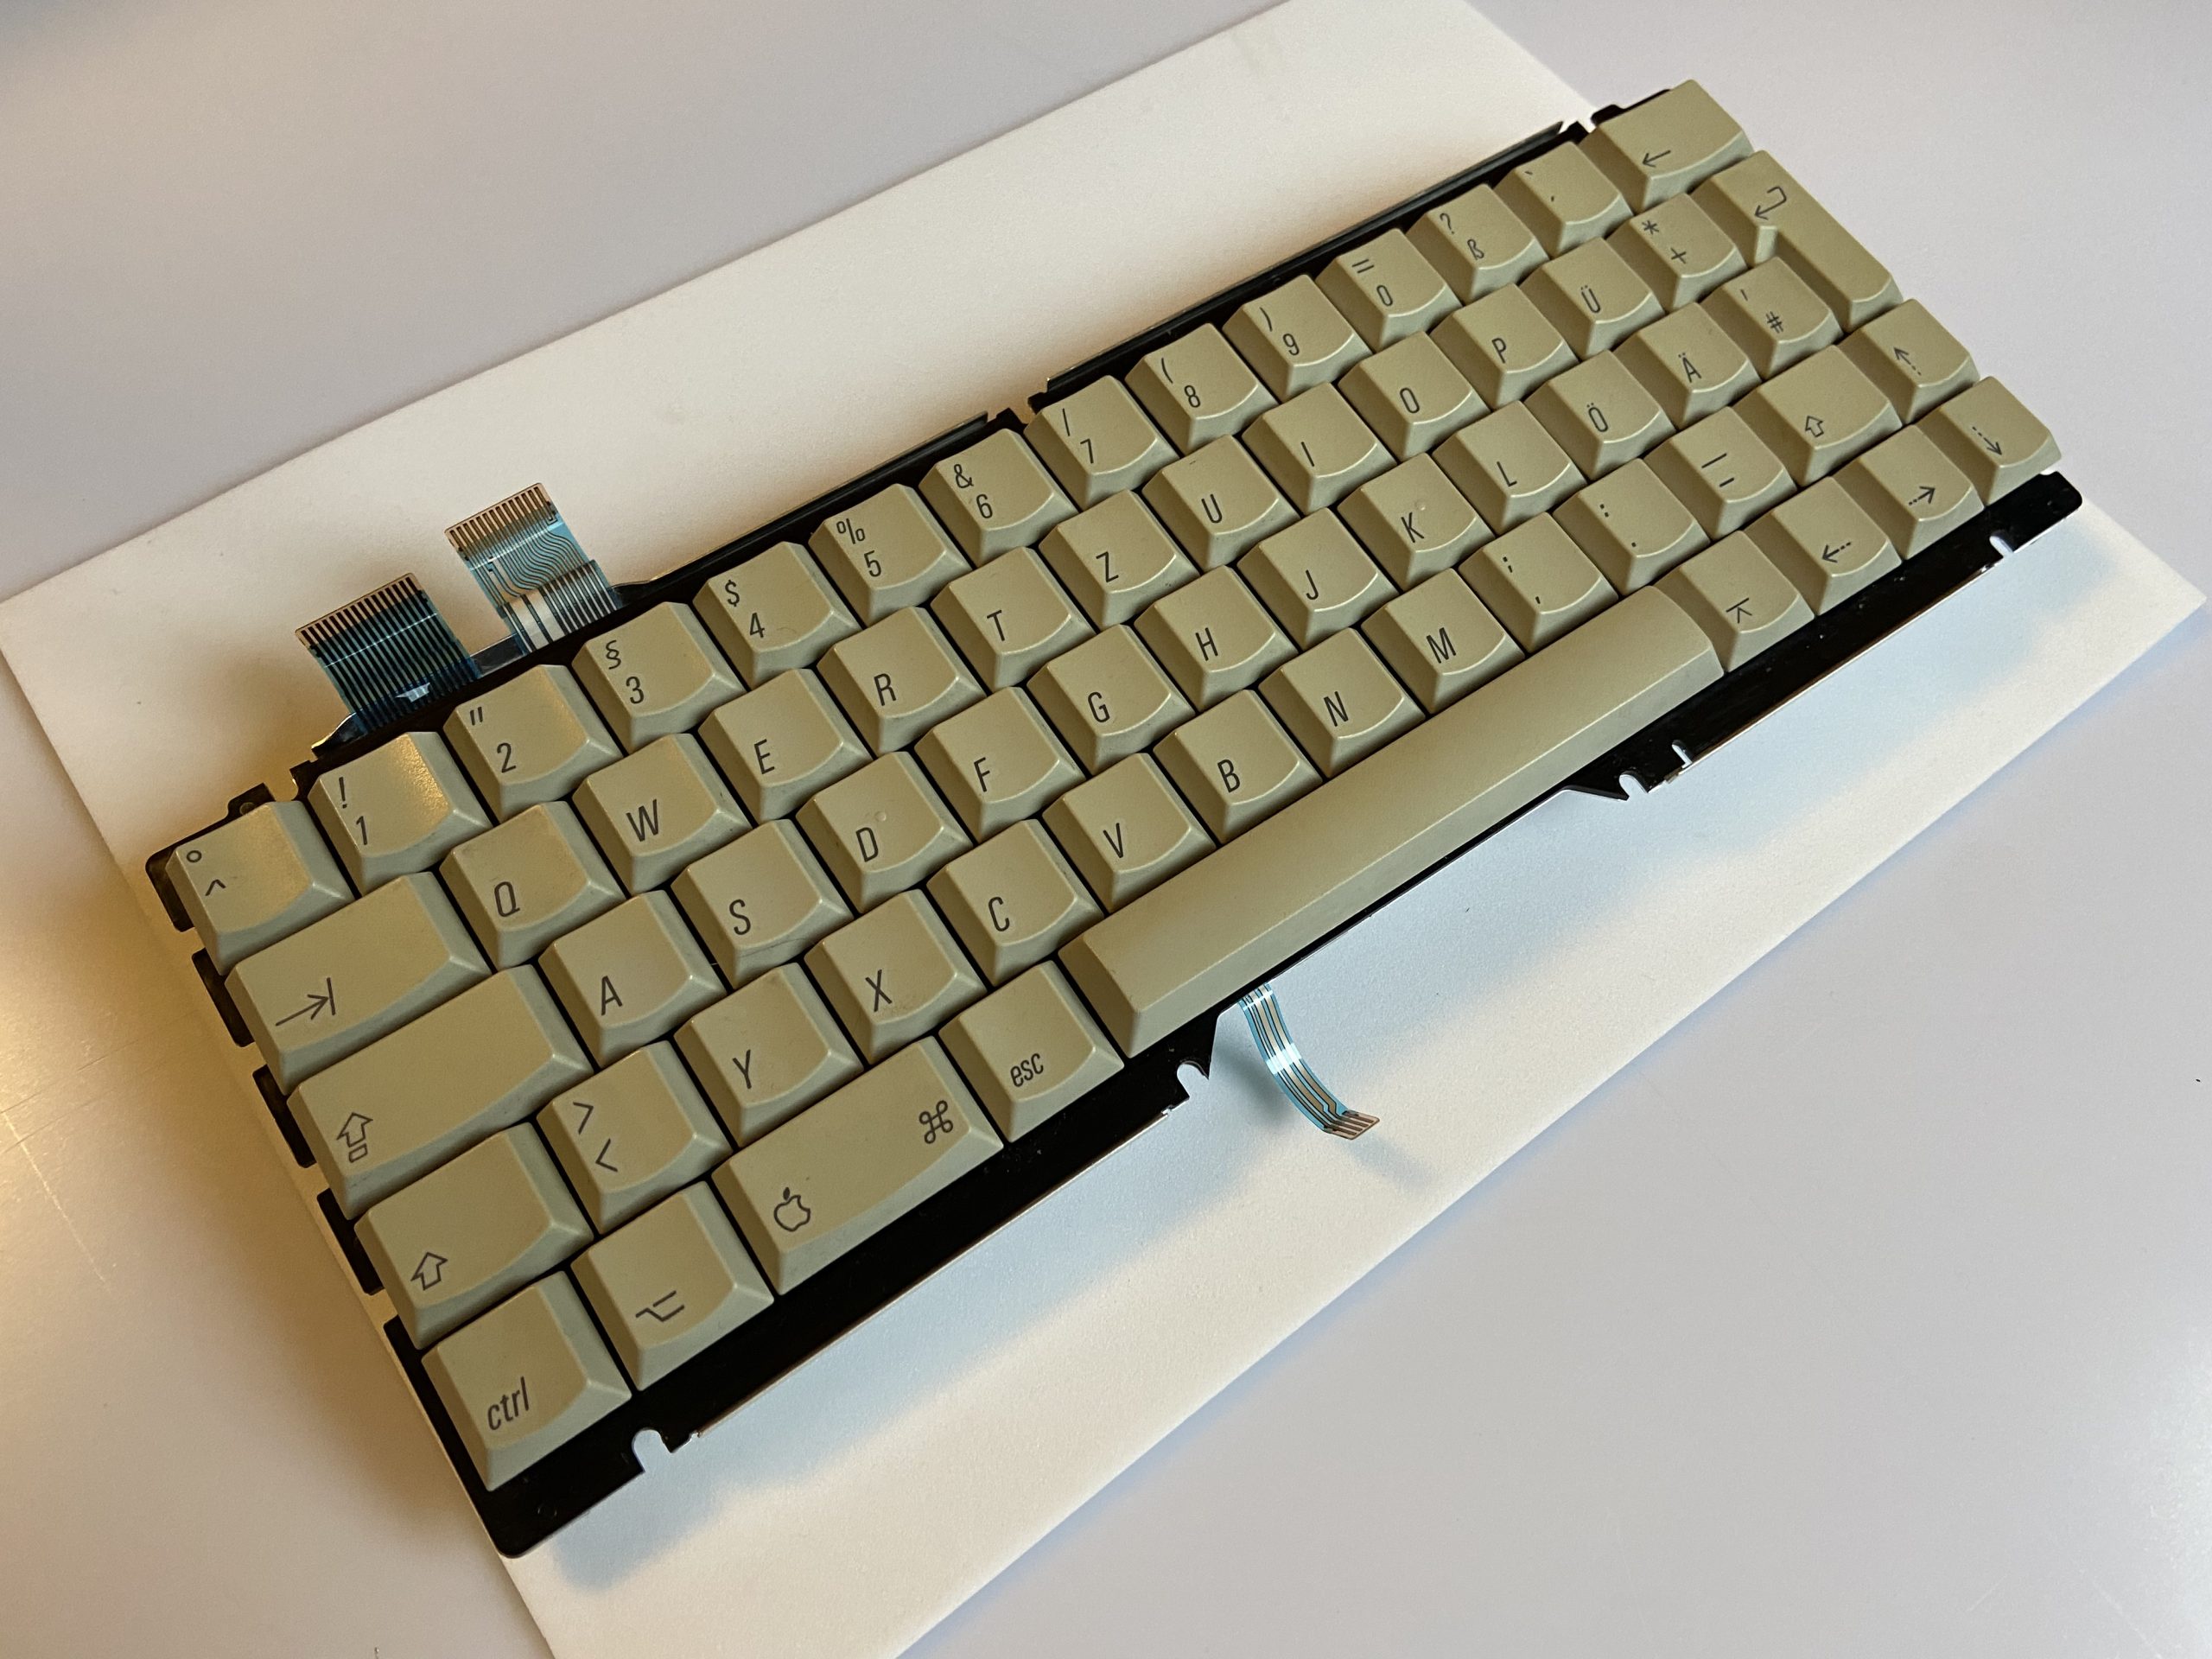
With everything clean, reassembled and all keys working, it was time to move on to get the machine running.
Fixing the chime of death
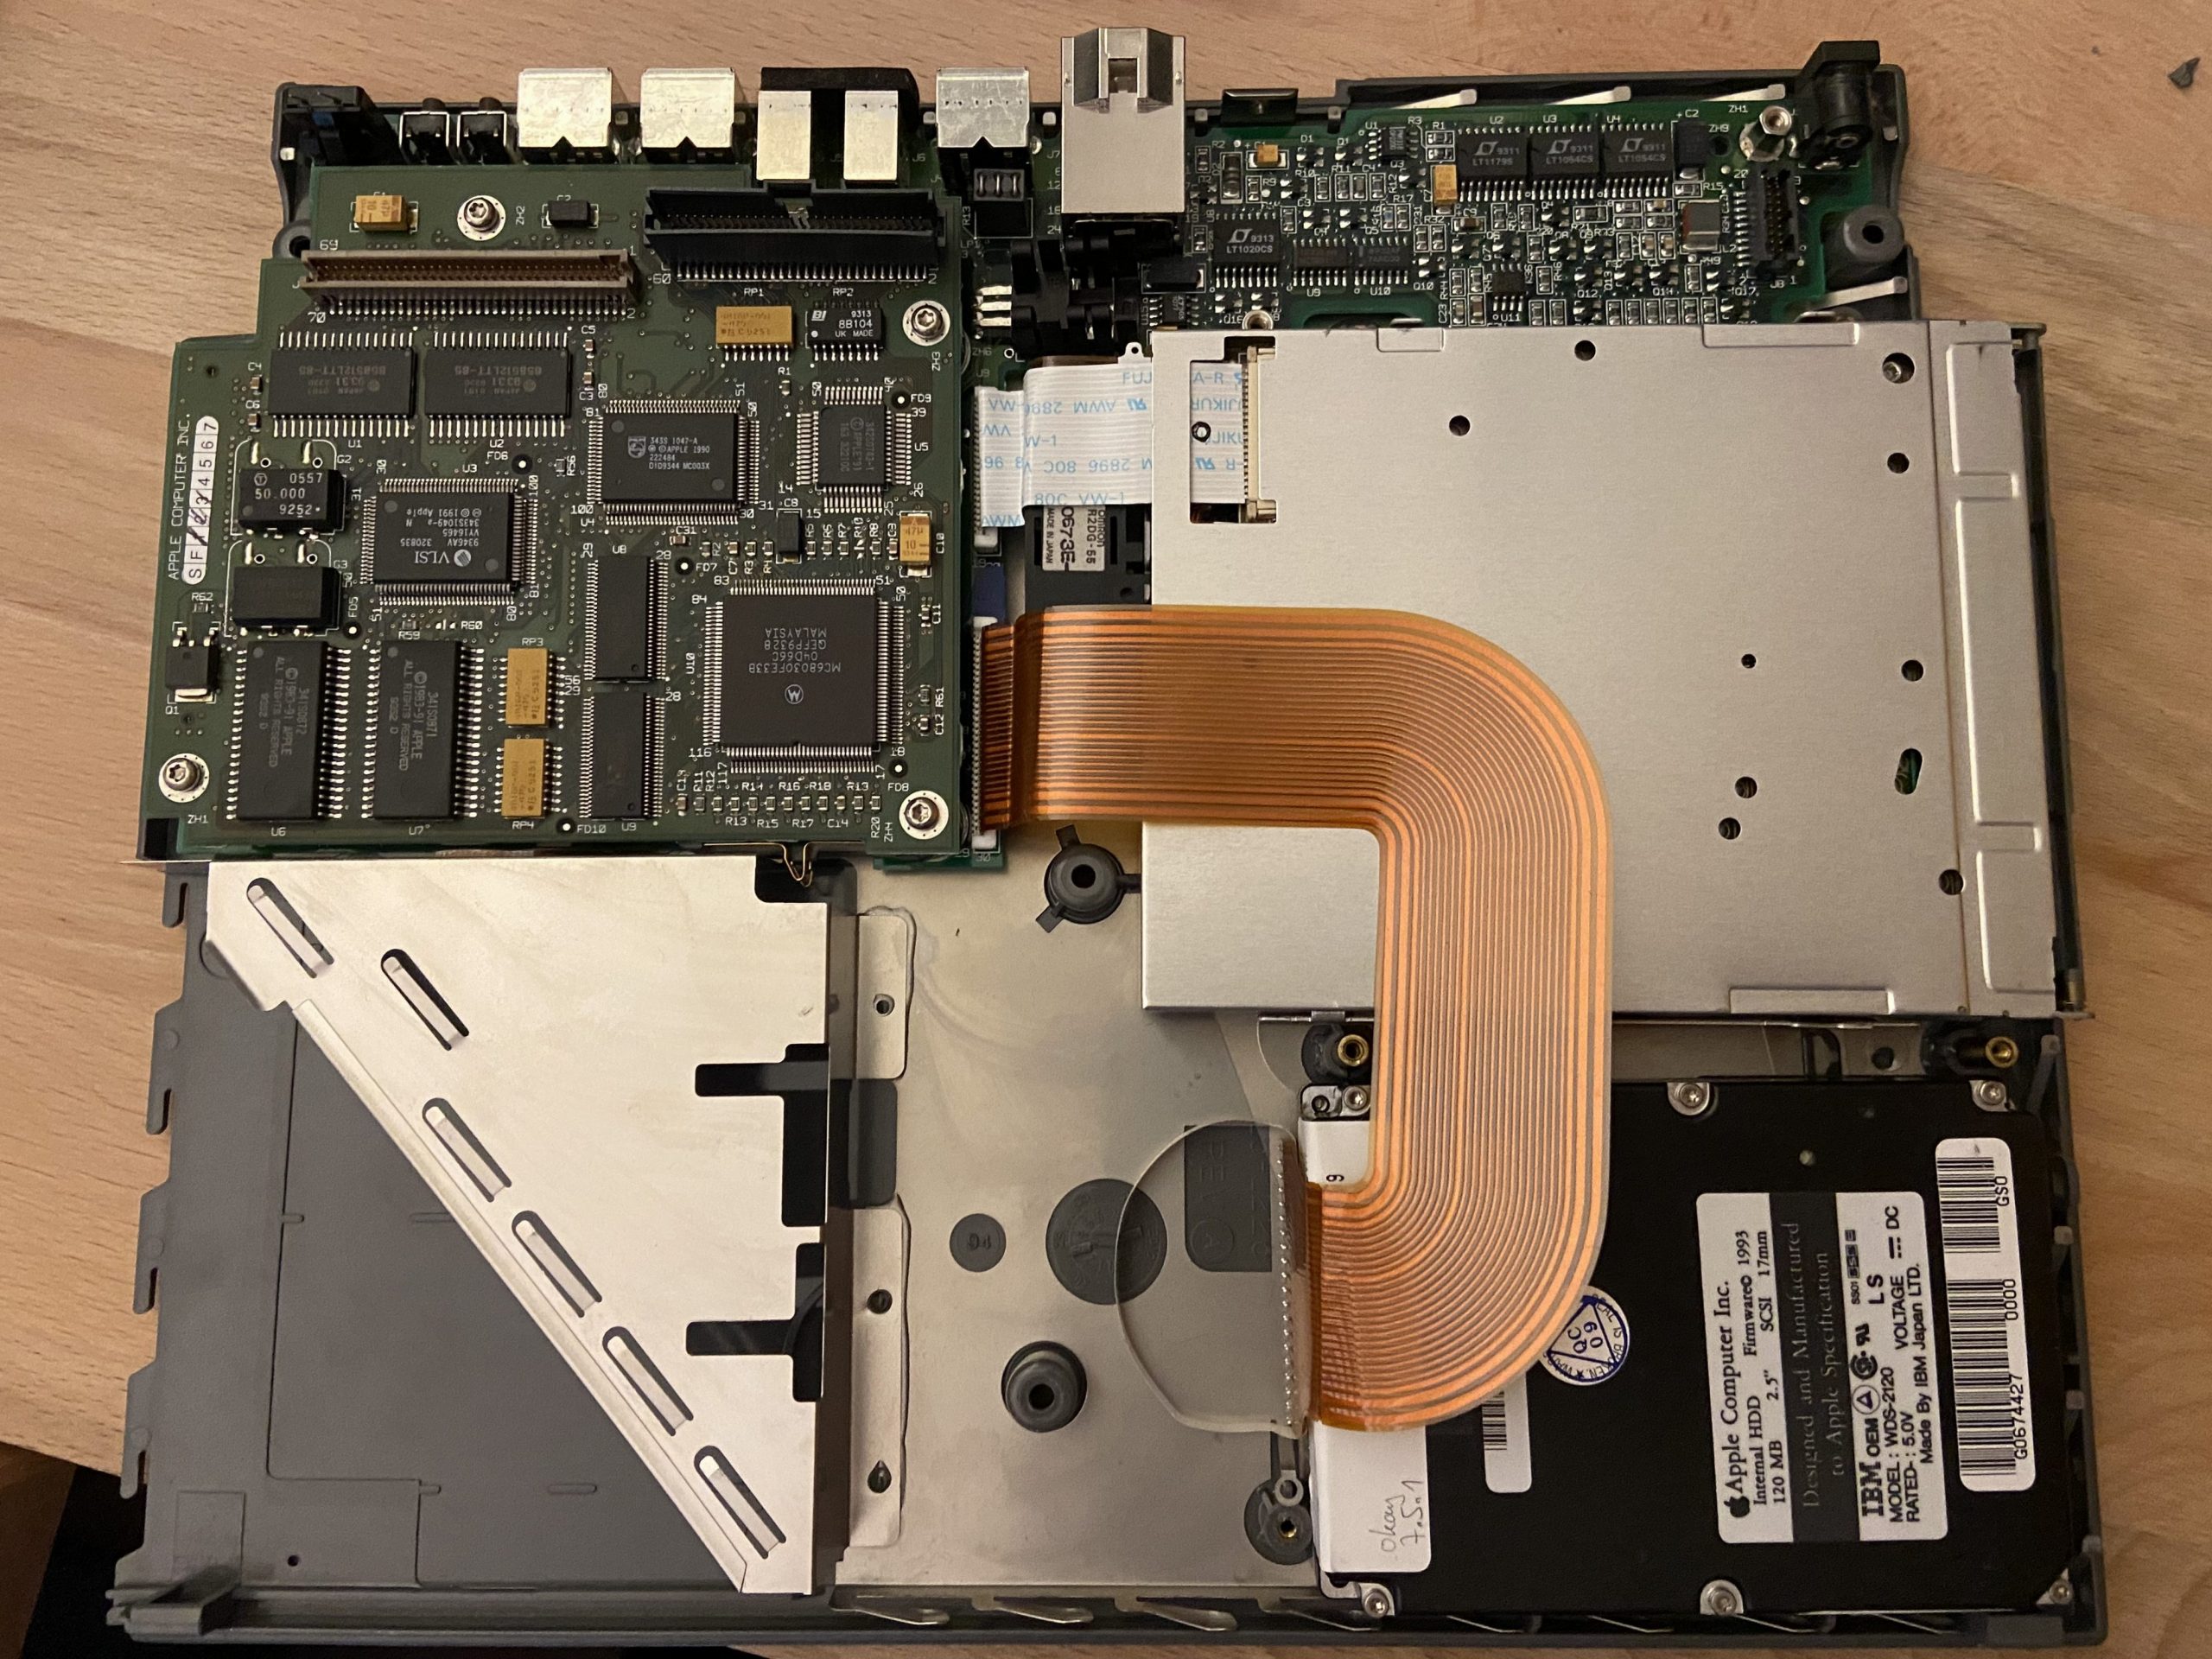
The 8-tone chime as per the Apple diagnostic manual indicates a failing RAM condition on the CPU daughter card. Cross swapping the CPU card with a parts machine confirmed this, the system was booting with the other card. Unfortunately I wasn’t able to find out what the root cause is, I didn’t find any bad traces, bad caps or dead resistors on the card. The interesting part though is that the CPU and the ROM must be working since its getting into its diagnostic routines.
Since I had nothing to loose, I unsoldered the RAM chips U16-U19 and swapped them with U1,U2,U11,U12 hoping that the problem would be in one of the 2M RAM banks. Interestingly, the death chime didn’t occur anymore once all RAM was removed. But of course, without RAM the machine still can’t boot.
So I decided to use the CPU board from the parts machine and leave the problem for later.
Backing things up and reinstalling the OS
Once everything assembled, the machine came up from its SCSI drive – a IBM made 120Mb 2.5″ – loading System 7.5.1 in a crazy configuration – parts of the system were in german, others in english. Maybe at some point updates in different languages were mixed?
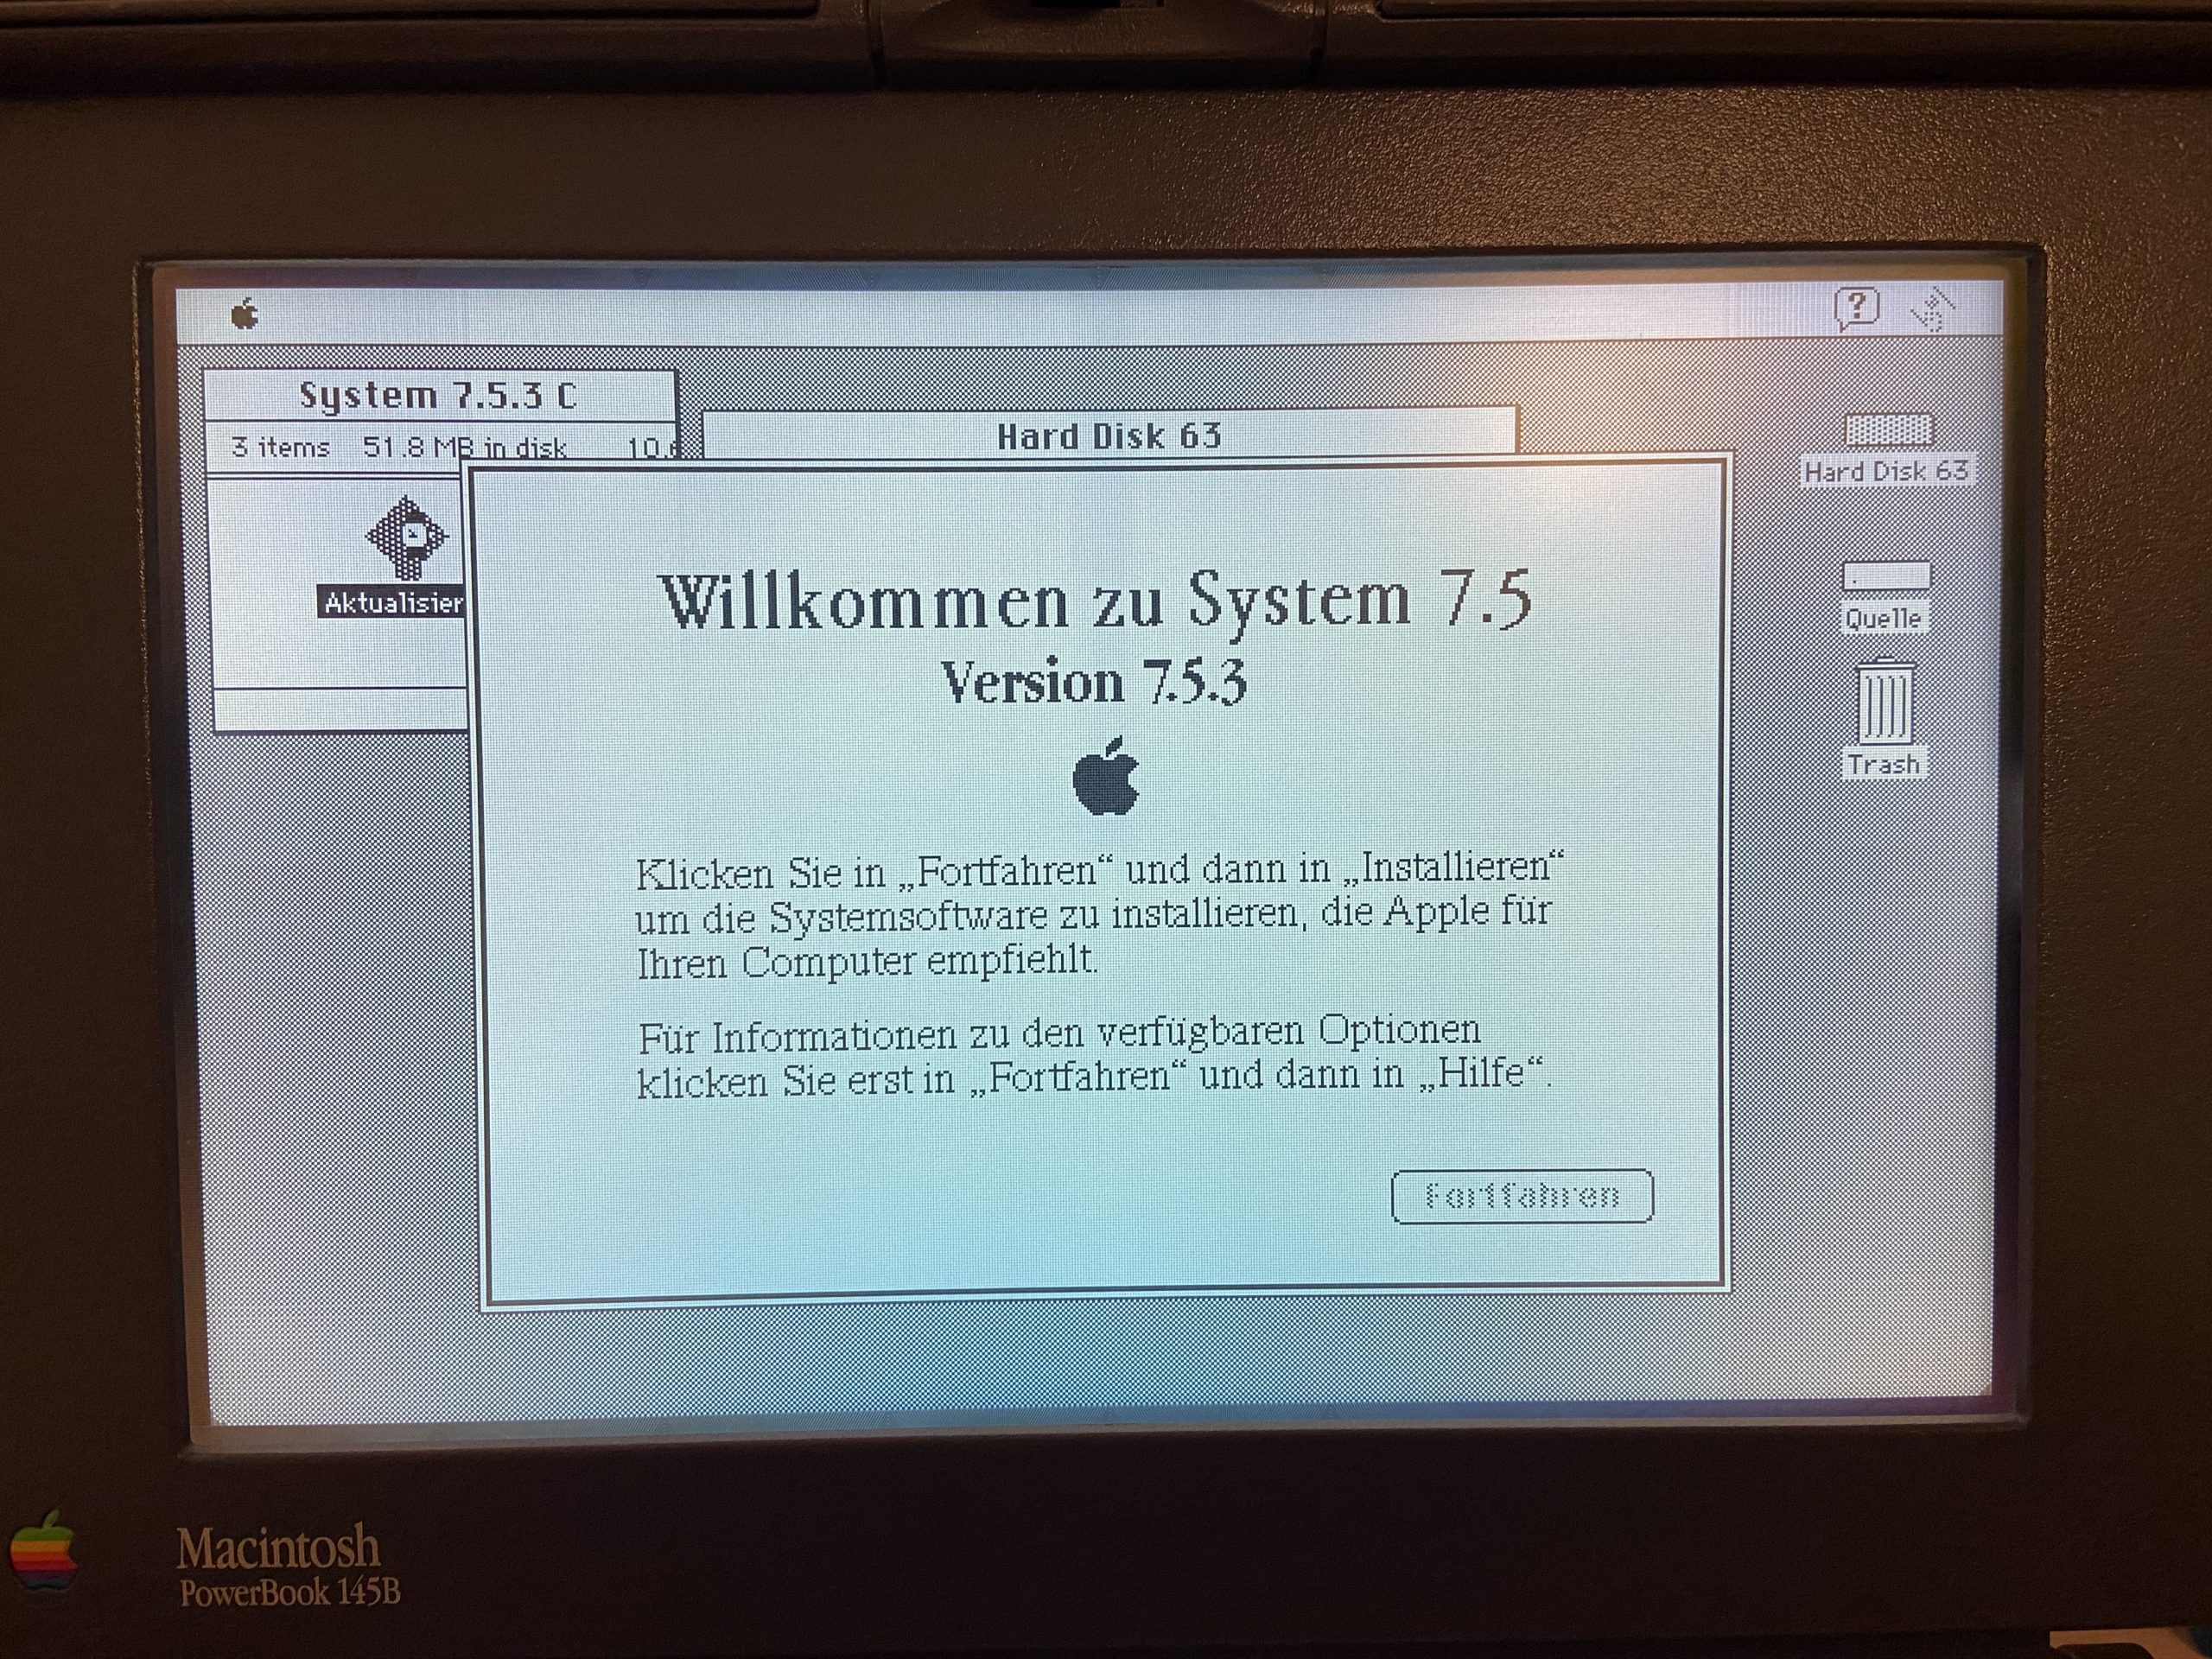
I opted for a complete fresh install of System 7.5.3 followed by the update to 7.5.5. Although 7.6.1 is the latest OS this machine supports, I’m holding back on that due to memory constraints. It can’t handle 7.5.x well with the 4M memory configuration.
For backing up and installing a fresh OS I used a piSCSI device – a Raspberry PI based SCSI emulator that I briefly reviewed here – which allows to mount virtual CD drives and harddisk images and to present them to a SCSI host just like real drives. It even supports masquerading as specific devices / manufacturer IDs to help with restrictive vendors locking down their drives to selected units.
As a backup device, I configured a 150M harddisk image and mounted it on the Macintosh side using hard disk toolkit which I happen to have on floppy disk. Then, I copied everything from the physical drive over.
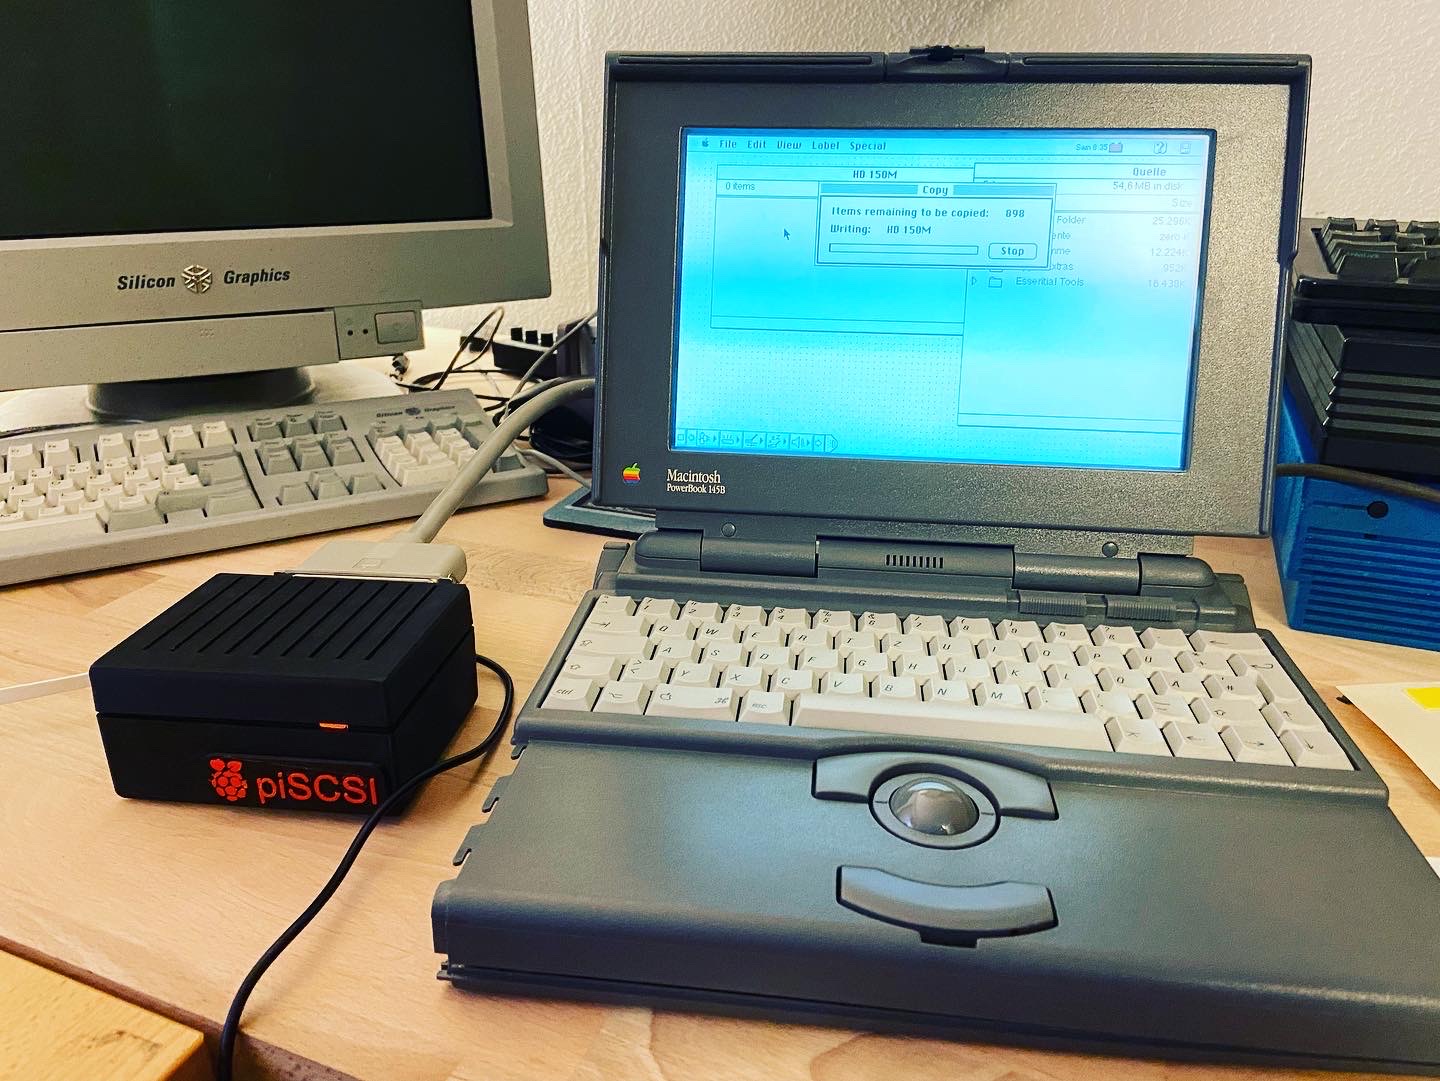
Once done, I unmounted the backup disk and mounted a harddisk image that I had prepared for use with the Basilisk emulator that contains a System 7.5.3 along with the installation files, so no floppies had to be made.
Using the startup volume control panel, I selected the virtual harddisk as boot drive and restarted, then erased and initialized the physical disk. Installing 7.5.3. is smooth sailing, picking the easy install option loads the software that is appropriate for the machine.
Then, change boot drives once more, restart and apply the 7.5.5. update and install more software.
Update Sept 2023:
Of course, once all was done, the original internal SCSI disk broke down in an unrecoverable way. It had issues already before, sometimes taking a while to spin up. But this time it was worse, scratching sounds from inside – that was it.
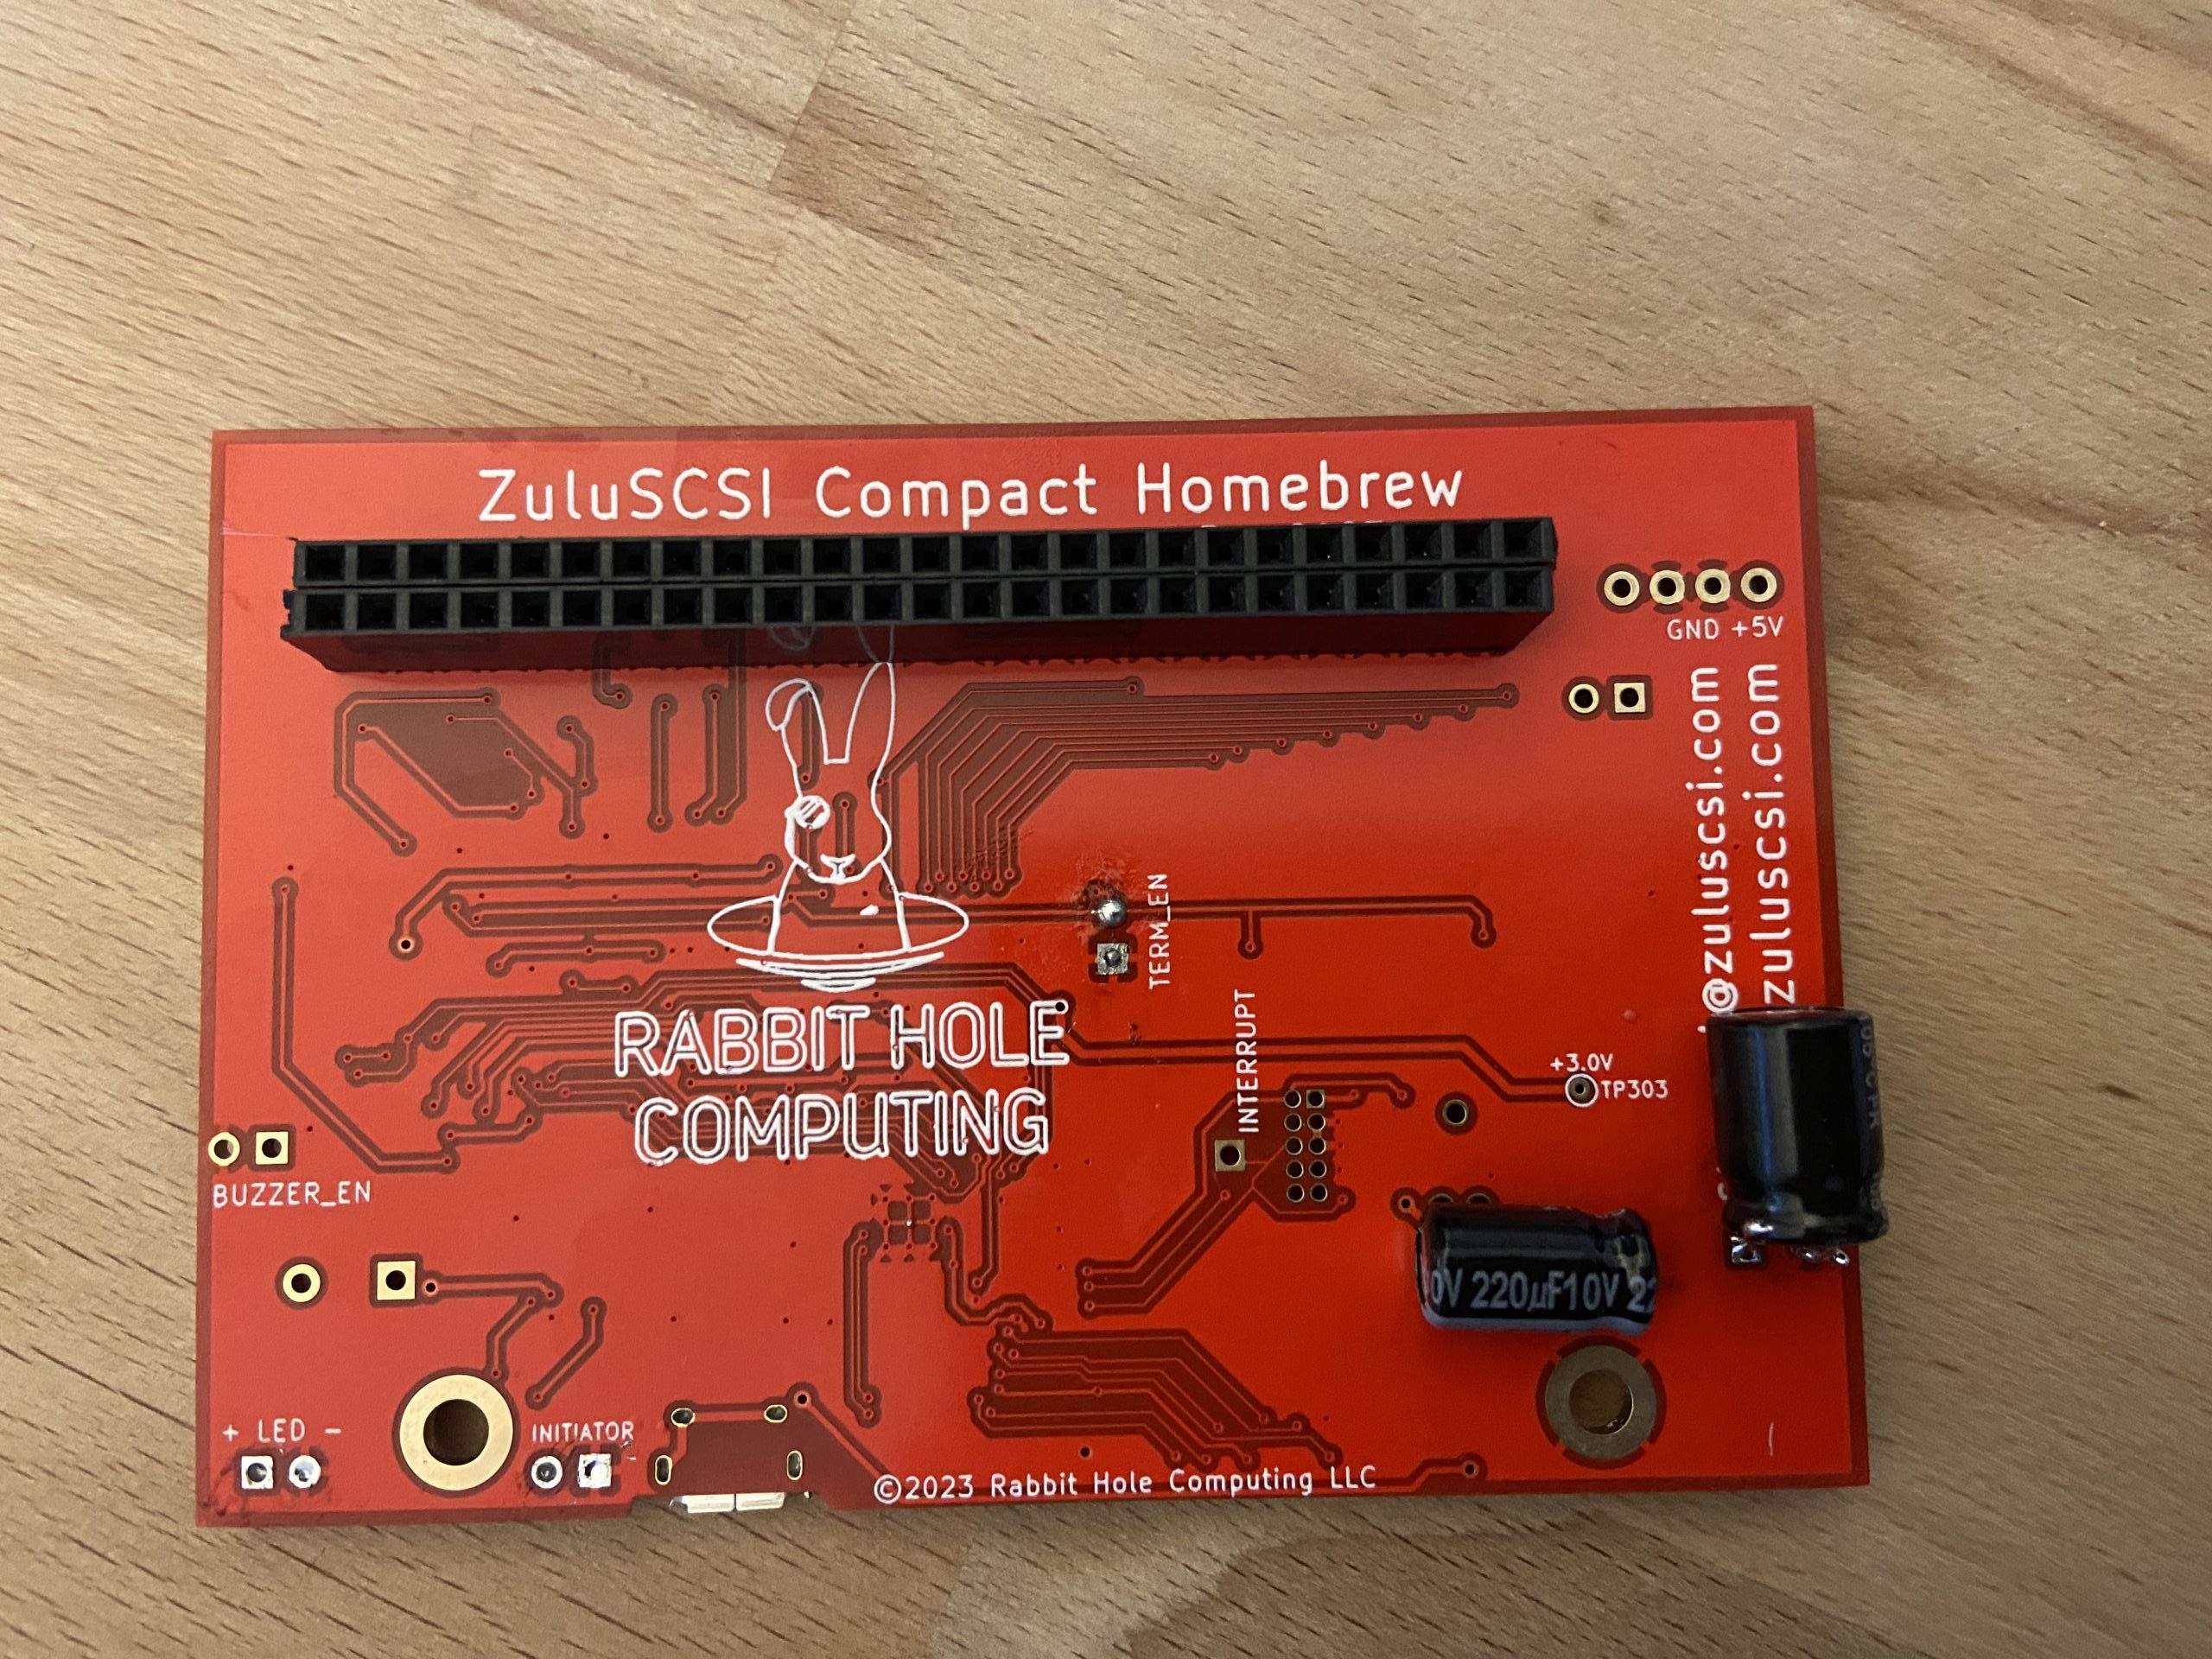
Have you ever tried to come by a SCSI2SD solution for internal use in PowerBooks? They do exists but seem to be totally unavailable. On the other hand, I had bought a whole lot of ZuluSCSI Homebrew devices so that I could use them in my SCSI based computers and throw all spinning rust out.
The ZuluSCSI Homebrew is quite small, I think it has the same footprint as the SCSI2SD compact and it comes preassembled, only need to add the SCSI connector and a few jumpers.
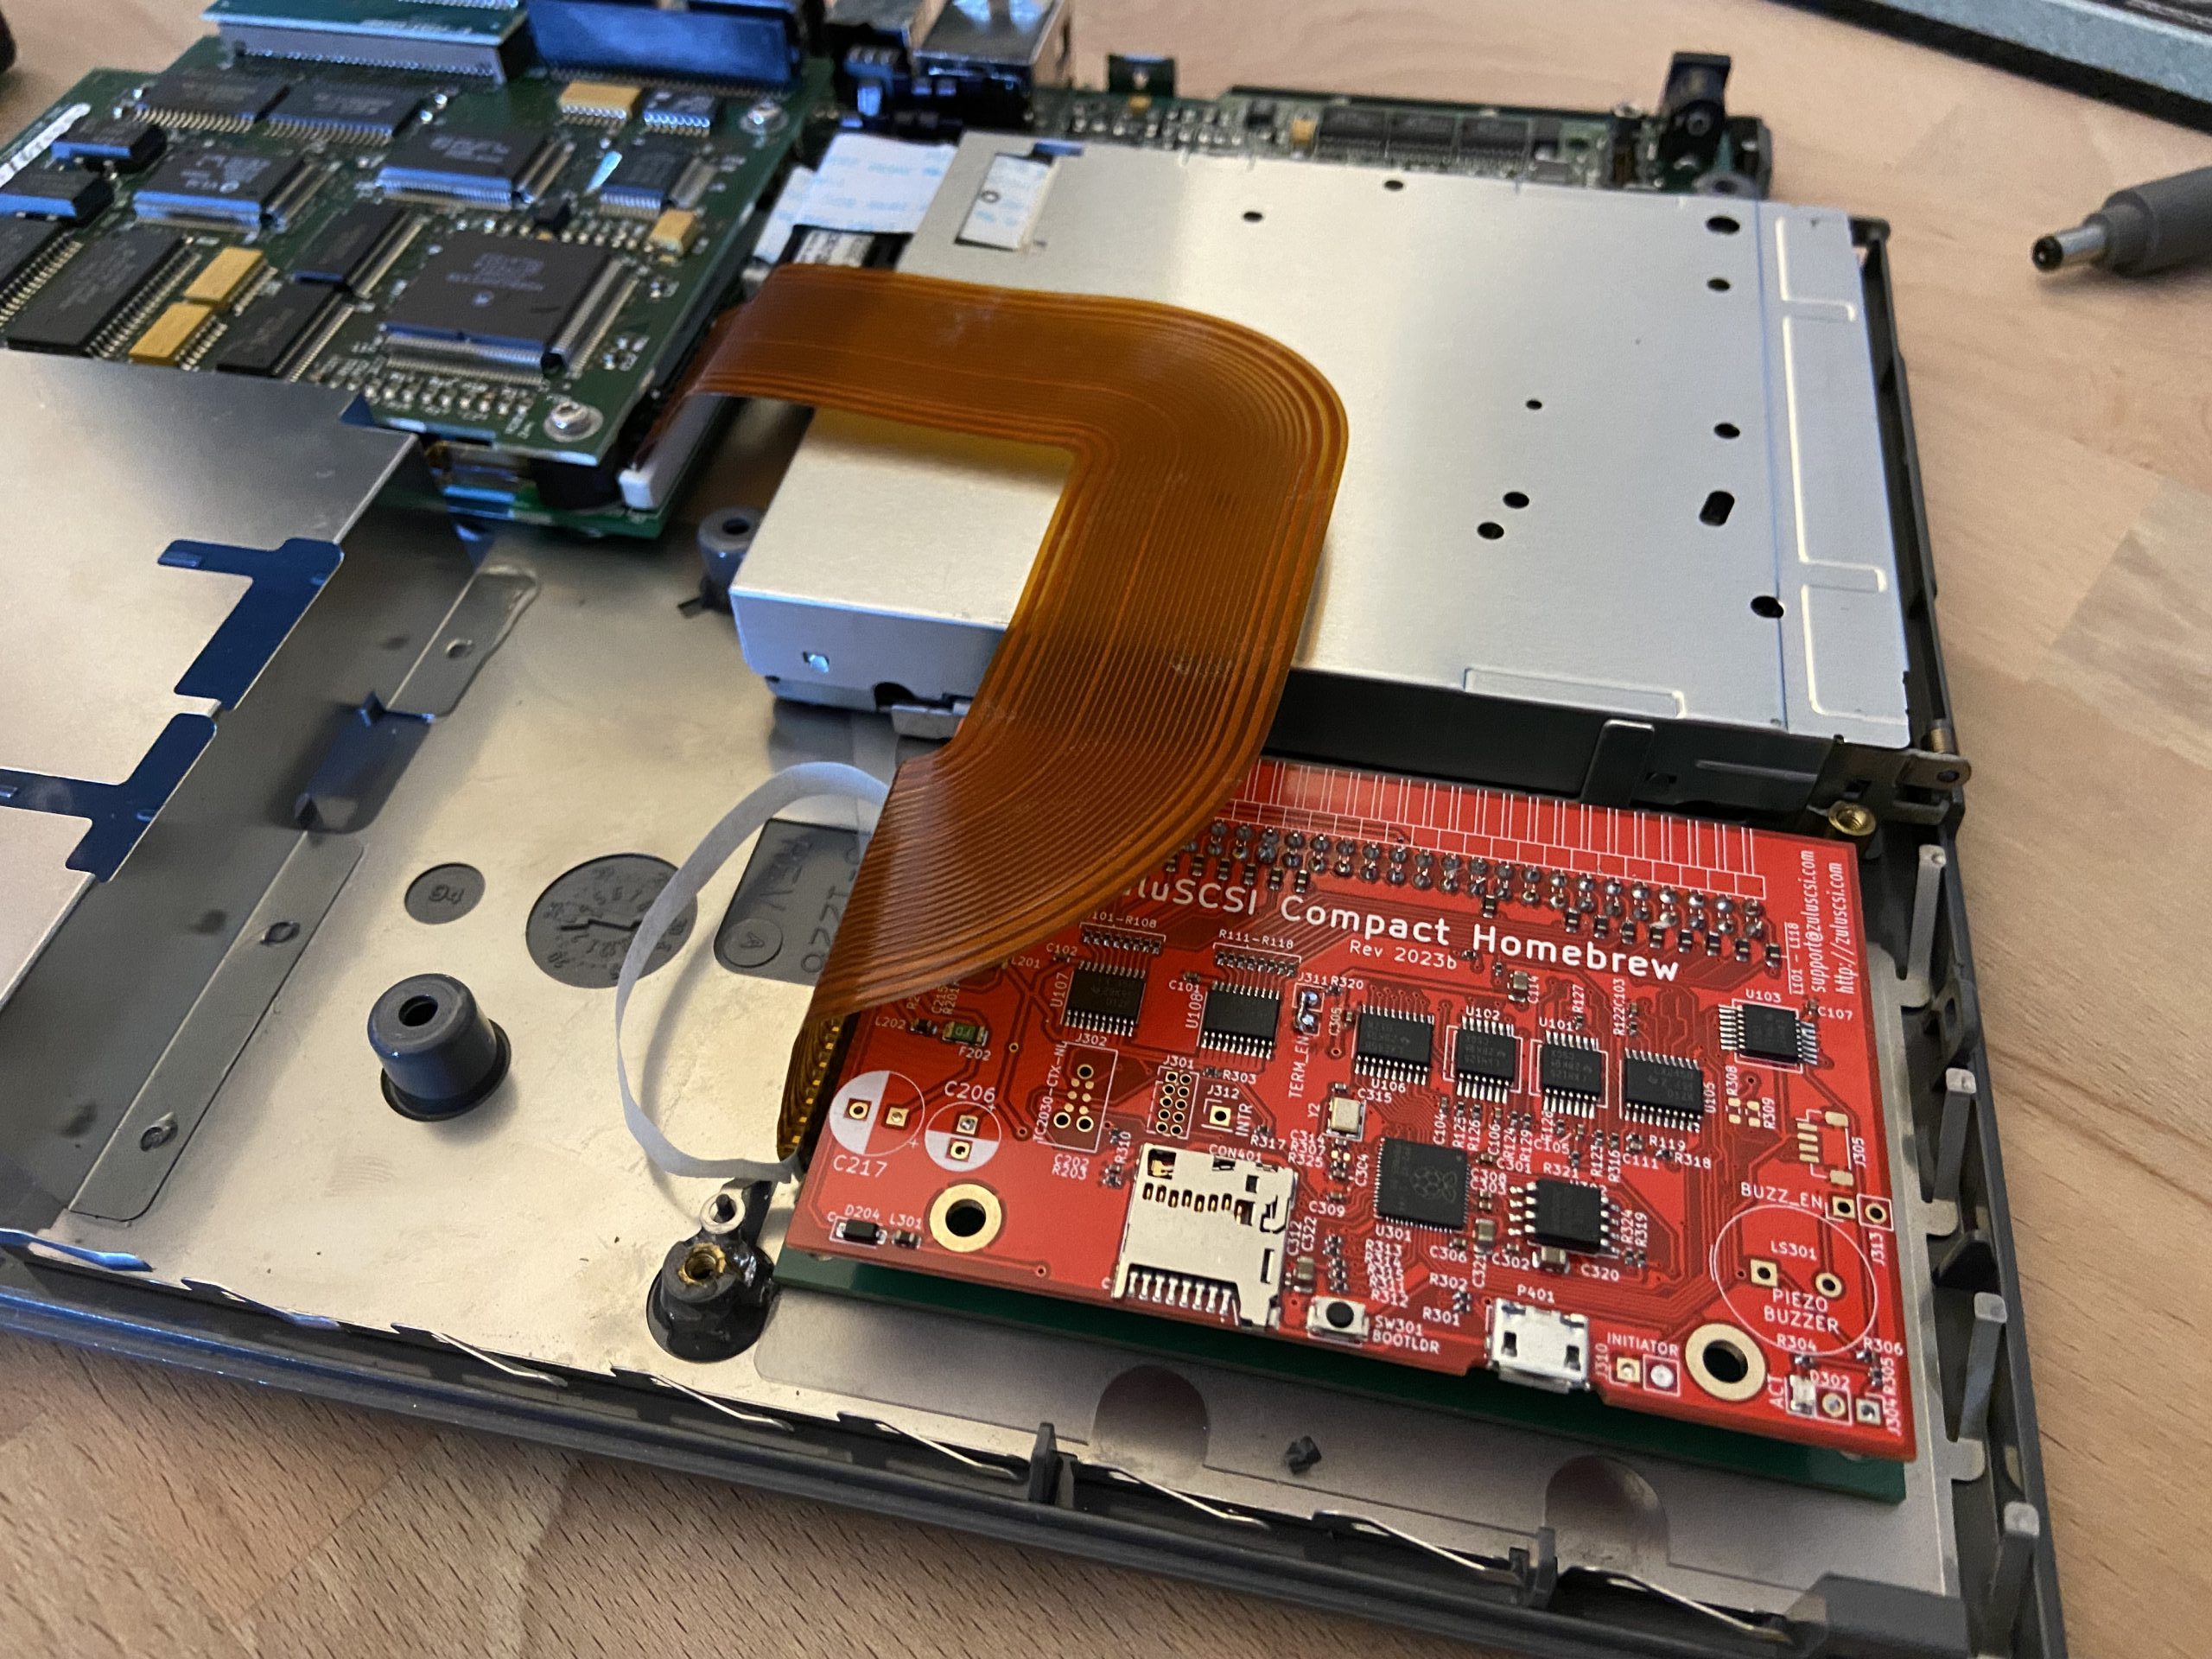
In the PowerBook however, the internal disk is attached to a 40pin flexcable that attaches to the short (front) side of the HDD, so there is no way to fit it directly to the ZuluSCSI that has the 50pin connector on the long side.
I decided to try something I wanted to do anyways at some point, that is creating my own PCBs for my electronics projects. So this came in handy as a useful but uncomplicated – electronics wise – guinea pig project to build some skill in KiCad and seeing how the ordering process with a PCB manufacturer would be. It turned out to be easier than I thought and after about a week I had a package with my first own PCBs from China.
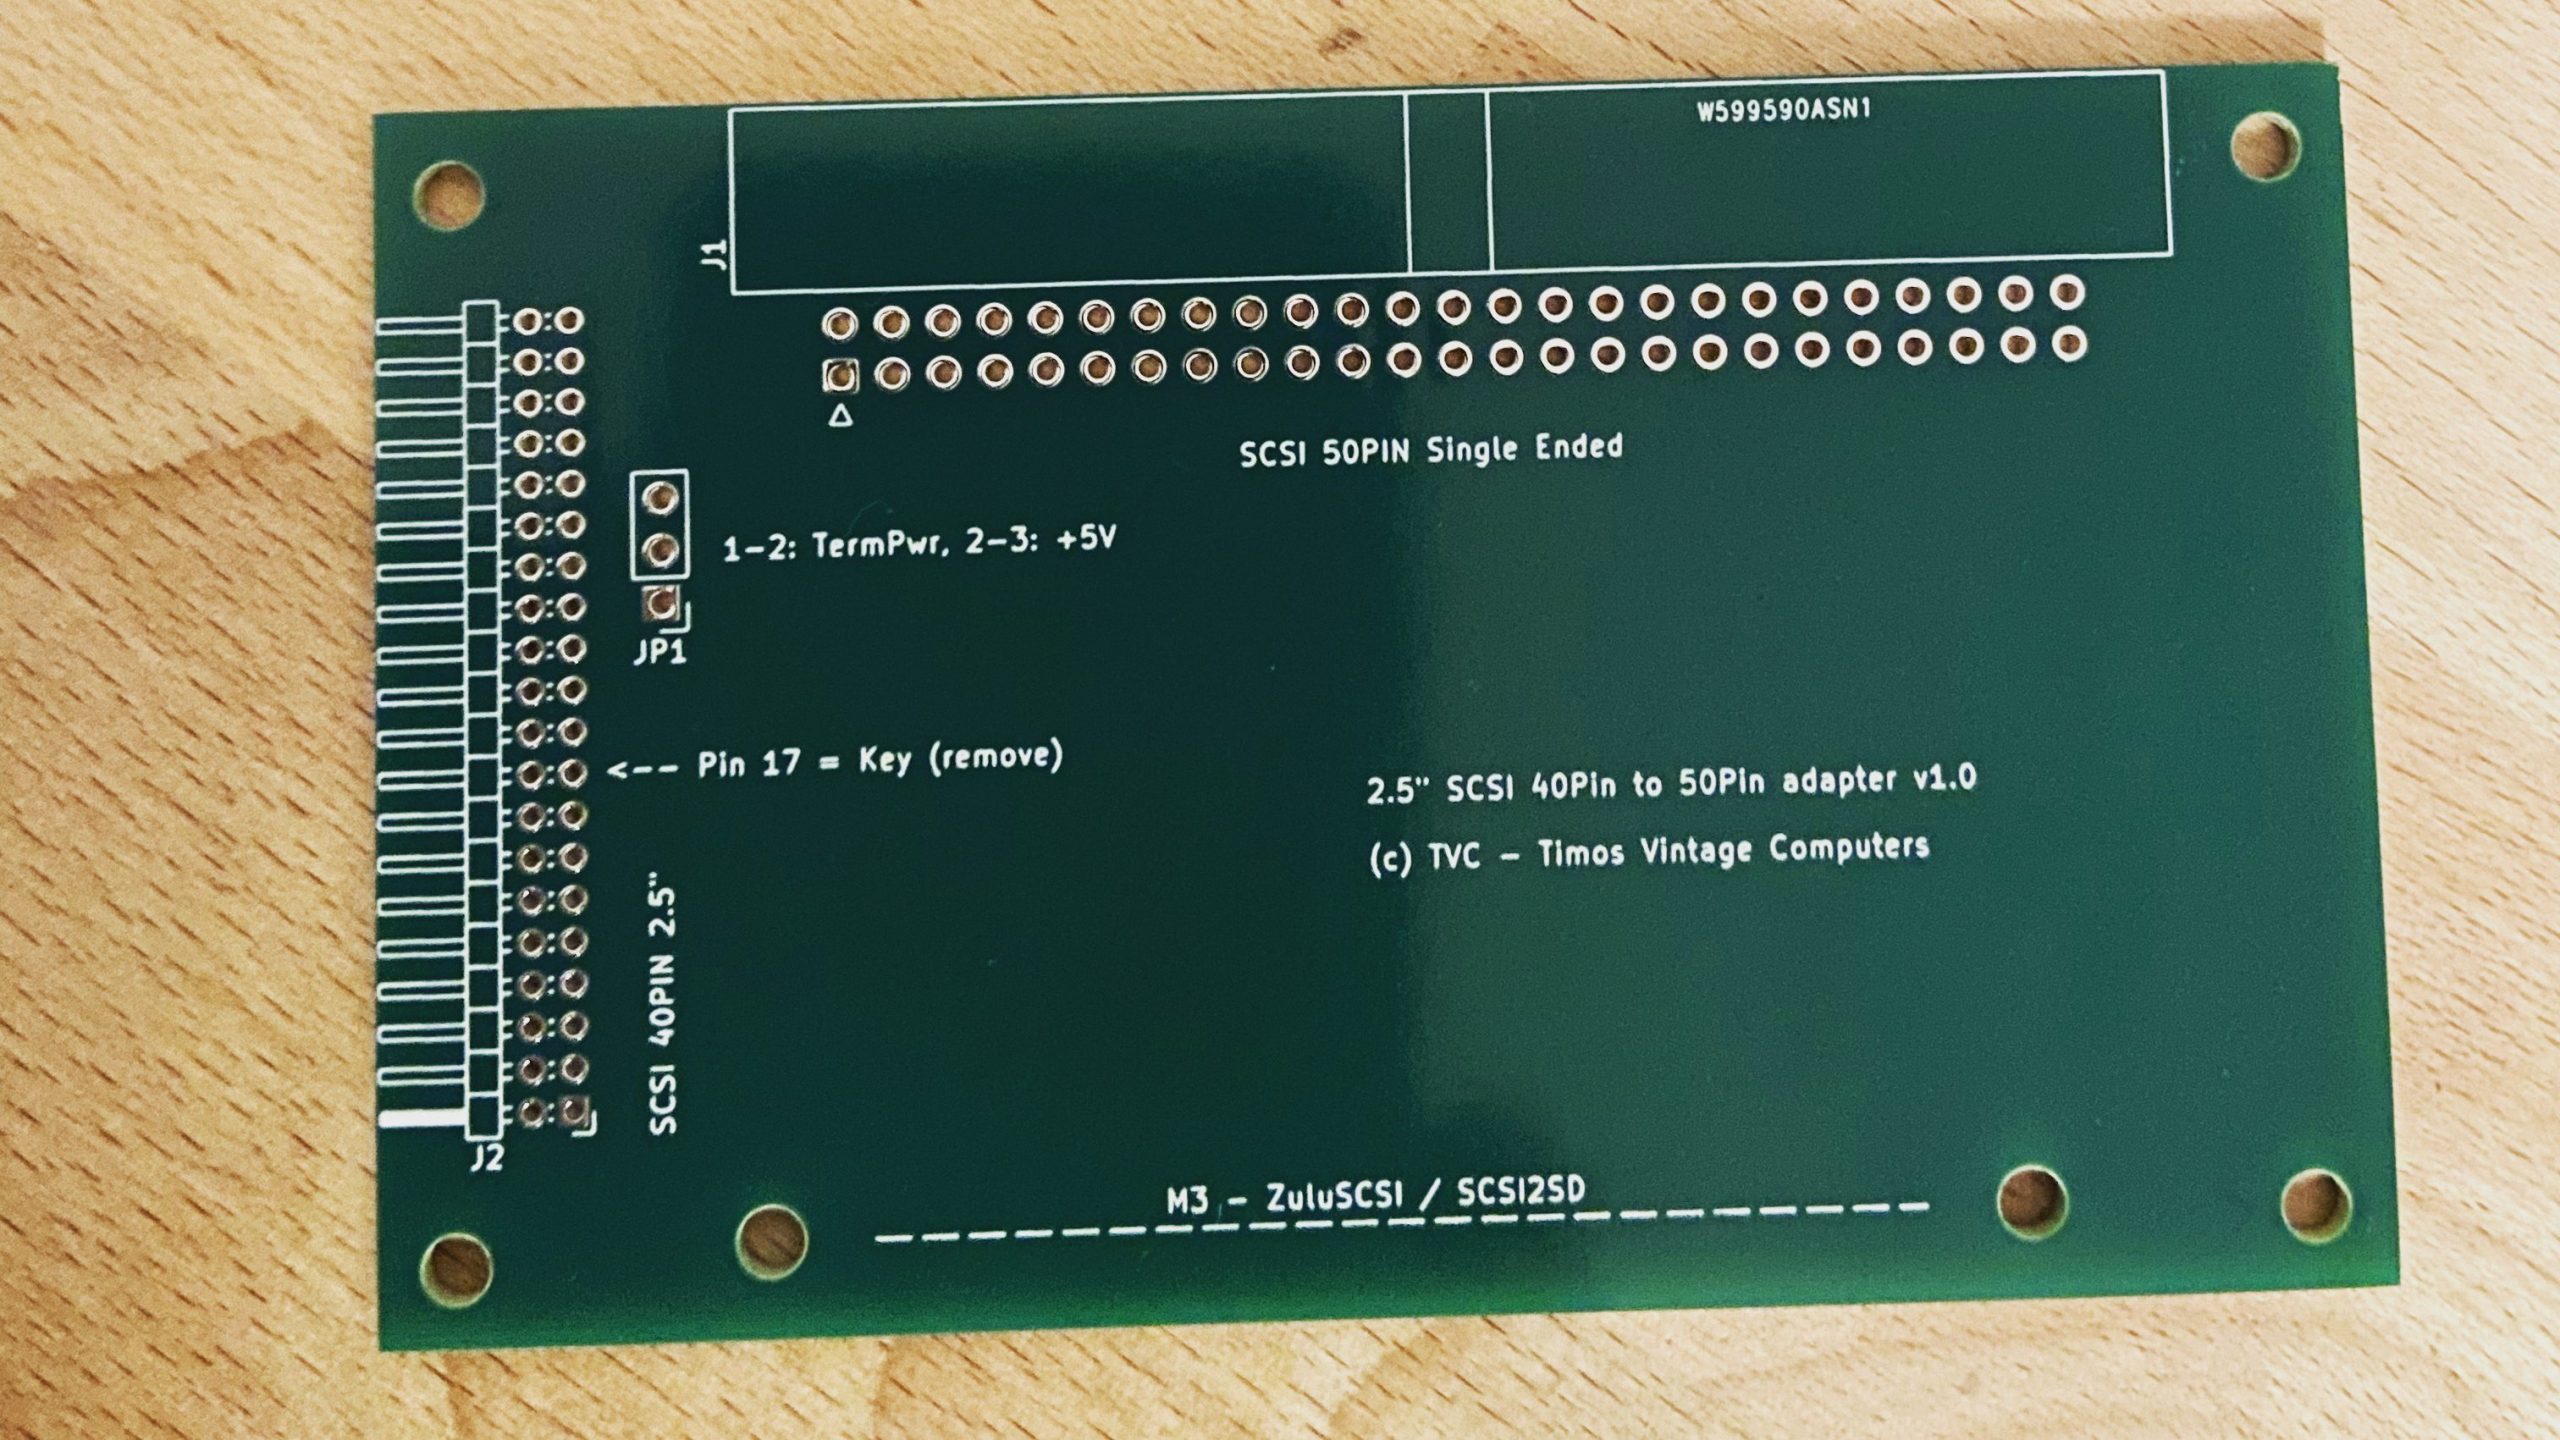
I designed this so that if sandwiched together with a ZuluSCSI homebrew the result is about the same size as the original drive and has the 40pin connector in the same place so that the flexcable plugs right in. The adapter also handles powering the ZuluSCSI via the termpower line.
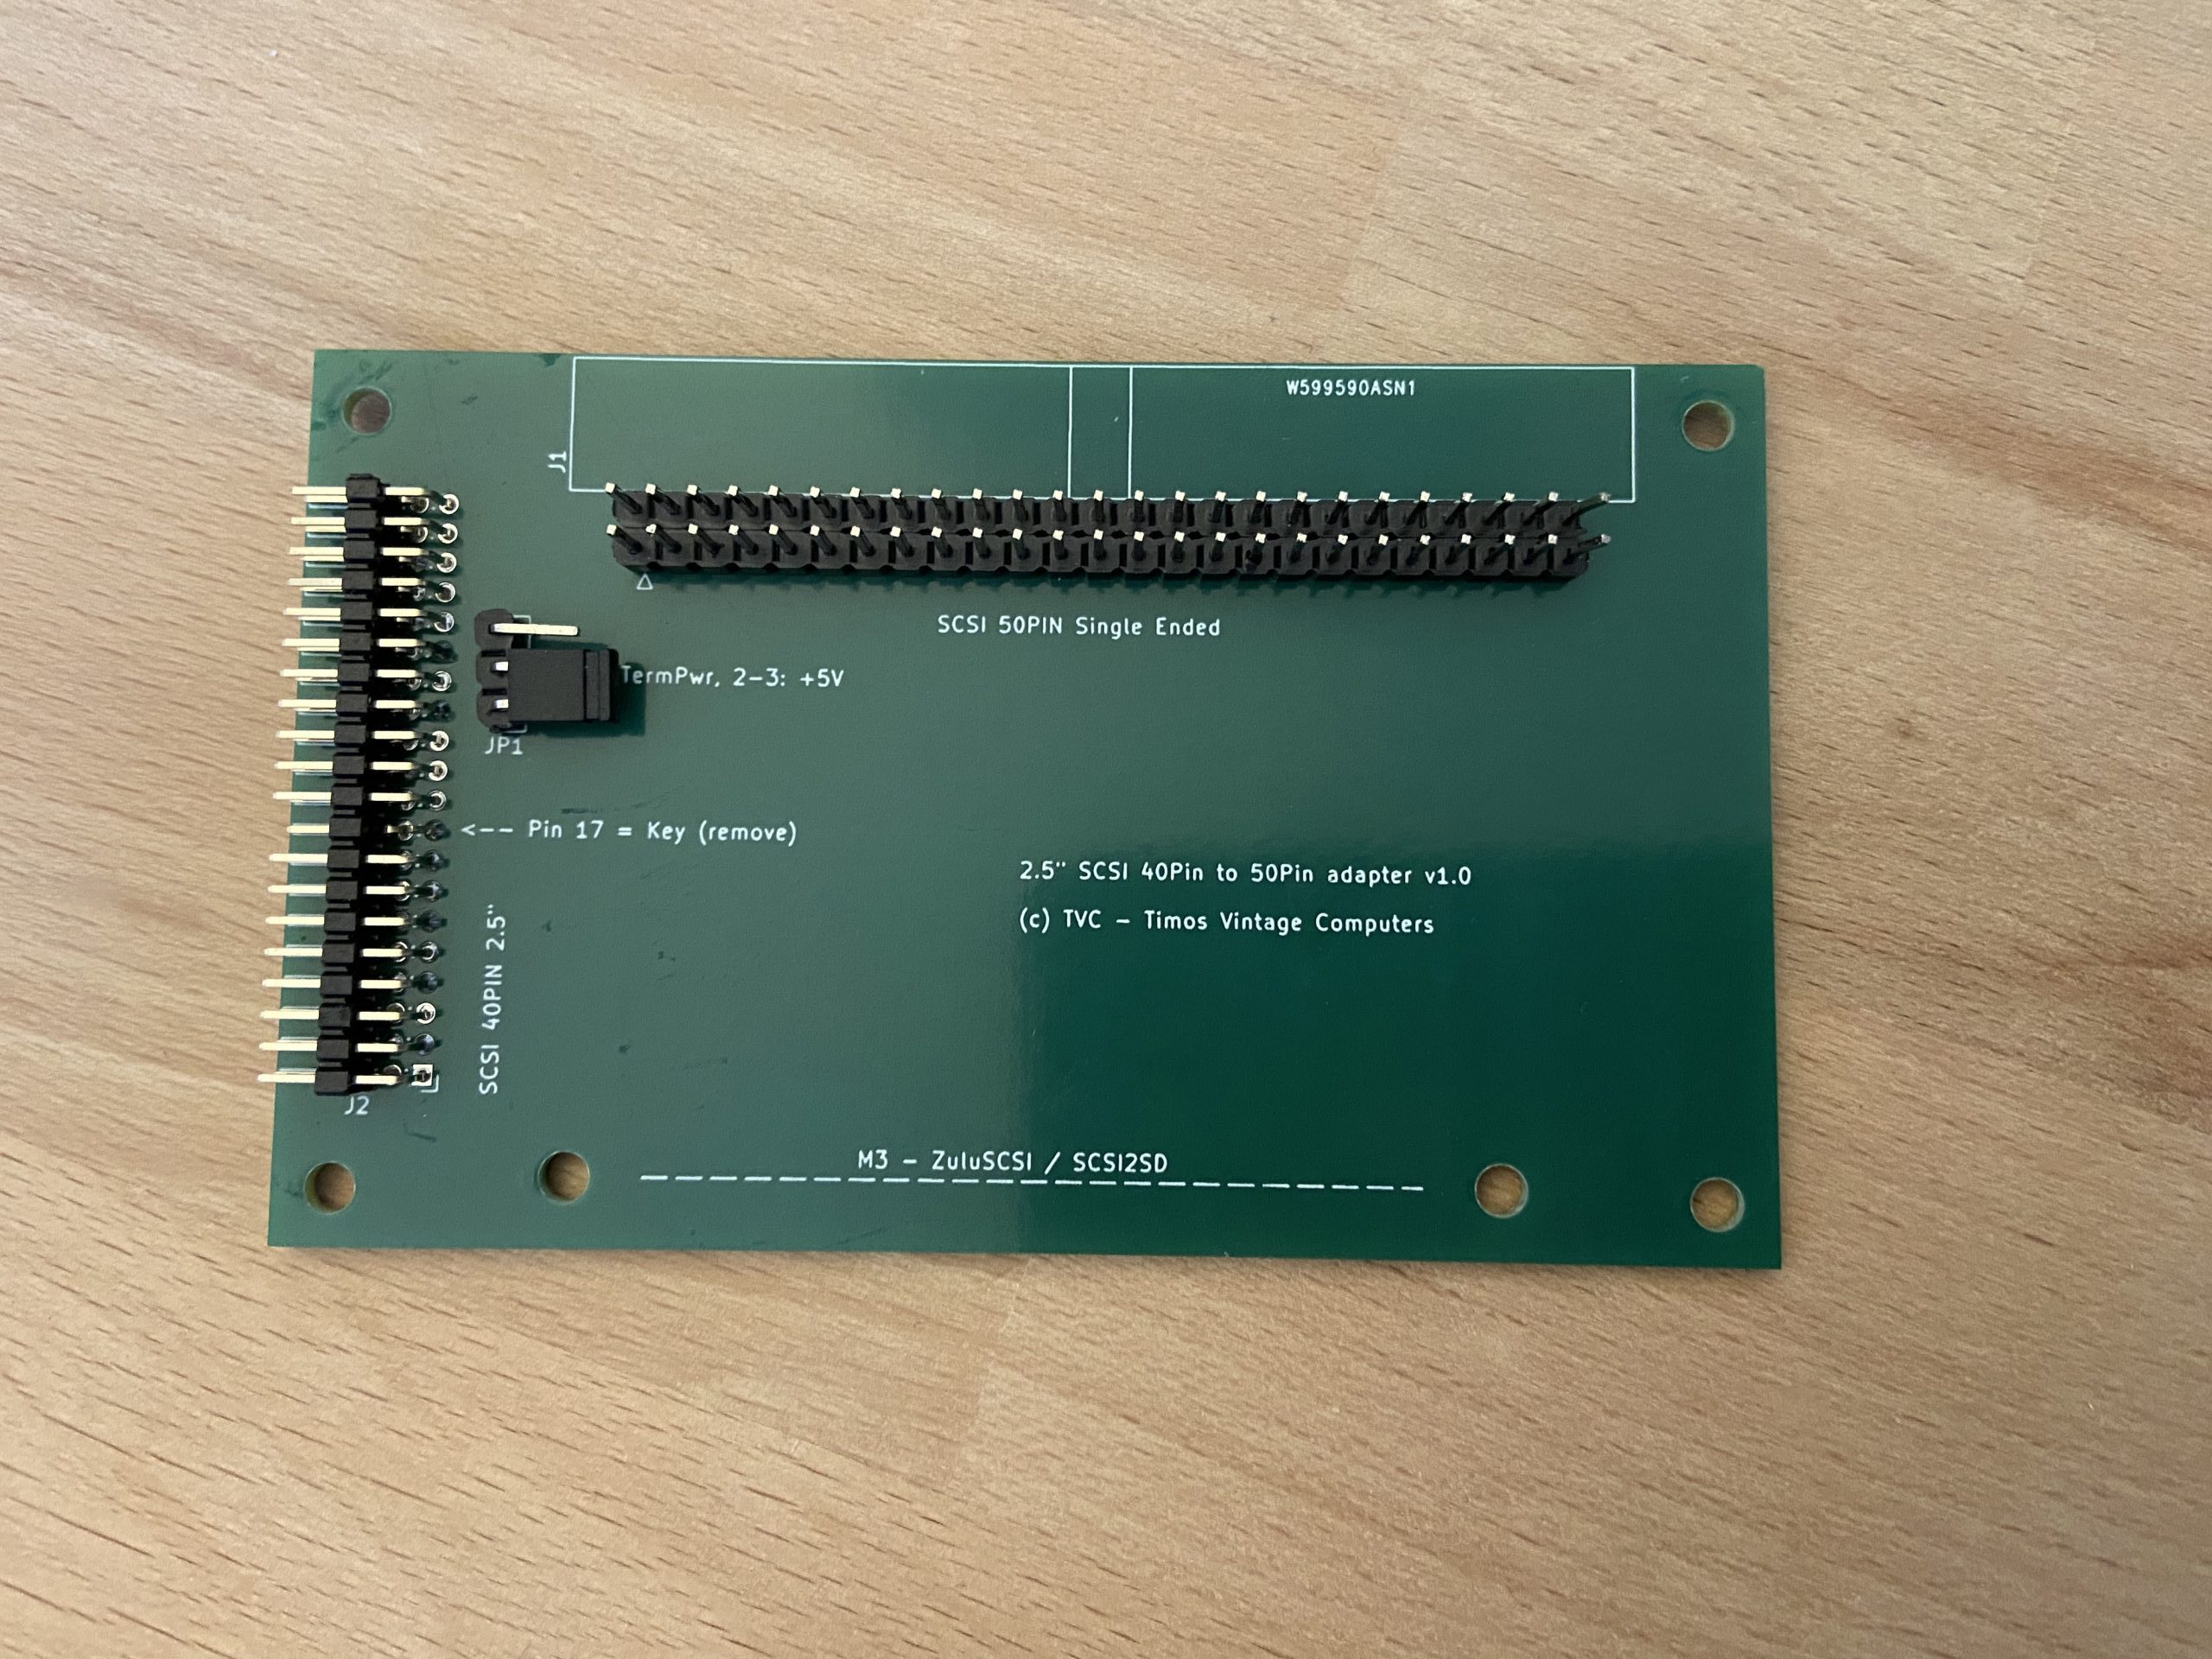
In order to make the adapter and the ZuluSCSI fit the PowerBook case, the idea is to install a row of 2×25 pinheaders on the adapter board and to install a matching row of 2×25 female connectors on the *bottom* side of the ZuluSCSI. This way, both can just be plugging together. An alternative option is to install a regular 50 pin IDC connector to the adapter and then run a SCSI cable to the outside of the computer.
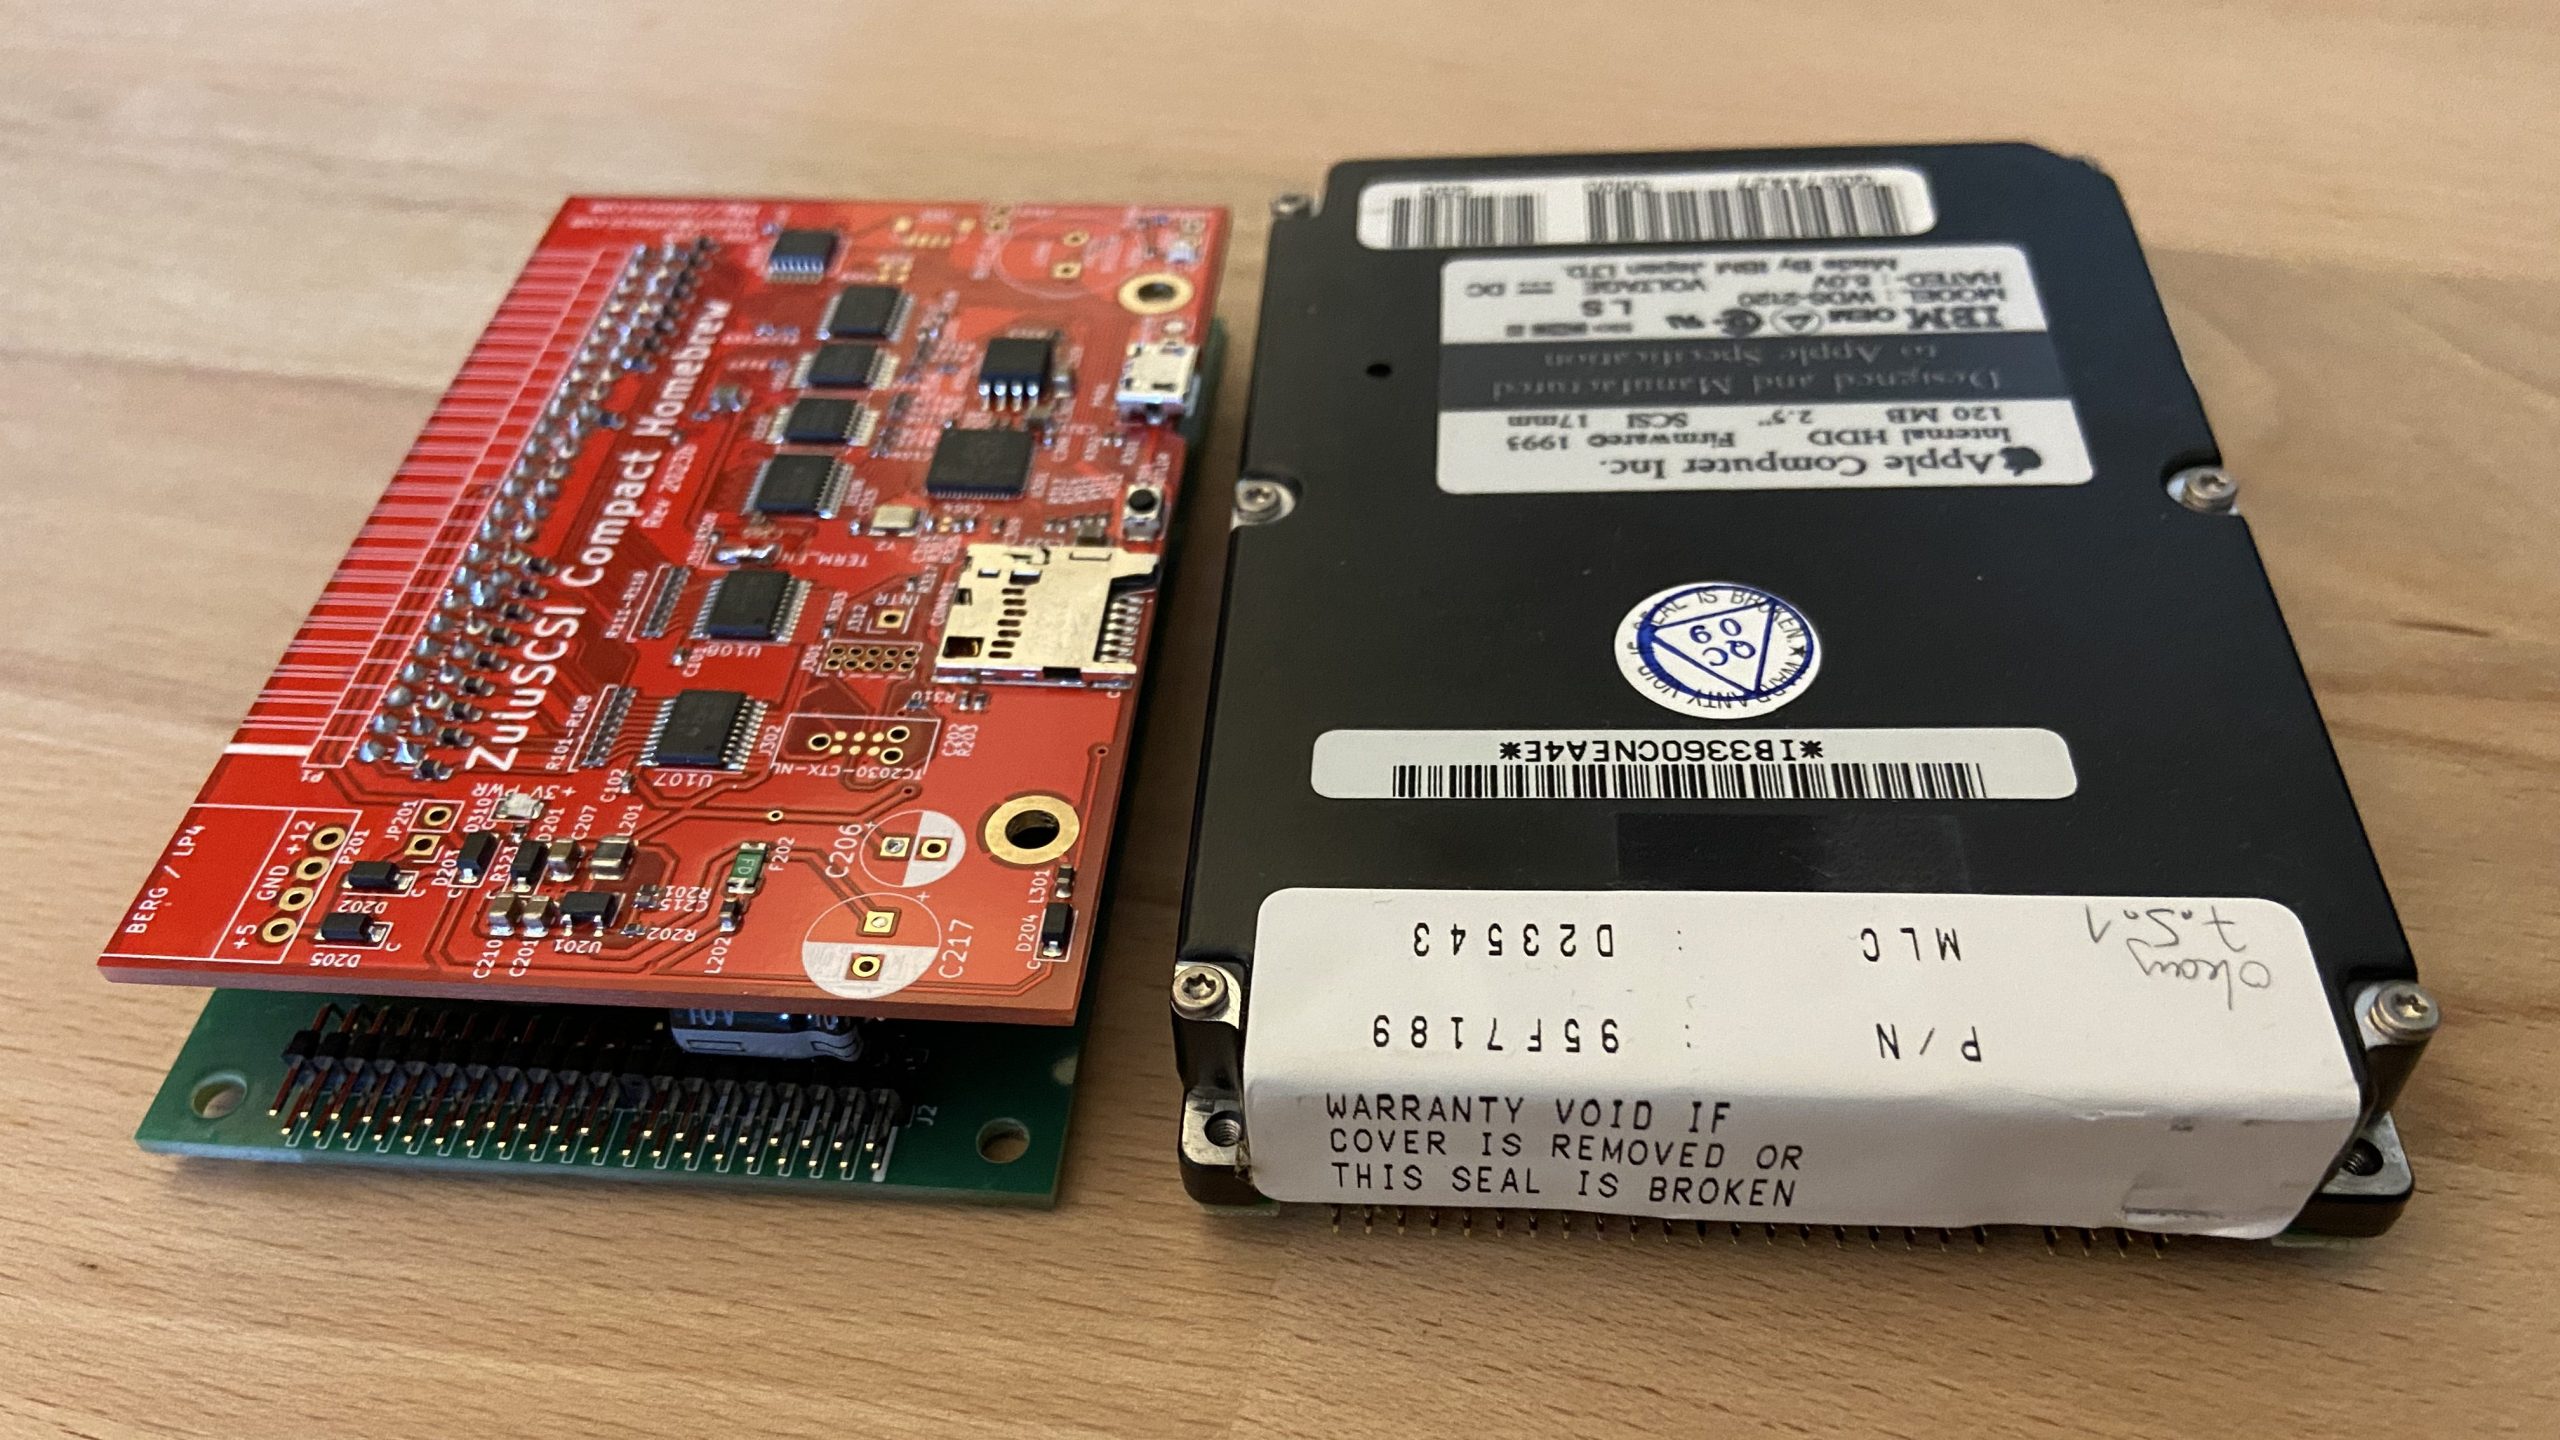

In the end, we have a solid state Macintosh PowerBook with a quite speedy internal disk. It feels a lot quicker than the external RASCSI solution and certainly faster than the old spinning rust drive.
If you like to make your own adapter, head over to my github repo and grab the KiCad files. Apart from the PCBs you’ll need standard 2.54mm 2×25 pinheaders and corresponding female connectors as well as 2mm 40pin angled pinheaders – these are a bit harder to find.
Testing and comparison
The PowerBook is clearly business focussed with its passive matrix, monochrome LCD. In direct comparison with the passive matrix monochrome LCD of a 1991 IBM L40sx that I have in my collection, the display is more responsive with less smearing. However, its older competitor offers 32 levels of grey whereas the PowerBook is just 1bit black/white. Also, the PowerBook 145 does neither have an external monitor connector nor is its hardware capable to support color graphics.
If comparing to IBM standards, then clearly the keyboard is something to take a closer look at and while the PowerBook keyboard is not bad – it‘s a membrane keyboard of course – the IBM L40sx keyboard – which is the „mother“ of ThinkPad keyboards – is much better. The PowerBooks keys offer some tactility but still are quite mushy with a undefined trigger point.
The PowerBook, as a machine which is exclusively UI driven, shines with a nice built in trackball device which is positioned in the middle of the palmrest and as such is ambidextrous. In 1993, IBM offered the TrackPoint in their ThinkPads while other vendors experimented with small trackballs near the screen (Toshiba) or Quickport devices (Toshiba, TI).
Verdict
Overall, the PowerBook 145B is a nice little laptop that supports up to System 7.6.1 and thus can be used to run classic 68k Macintosh software. In that it is limited by its monochrome screen, so anything graphics focused and gaming is pretty much out of the question. Upgrading the memory to the maximum of 8MB is advisable since the system software grabs well over 2MB alone.
It has all the classic Mac IO ports though, SCSI, ADB and serial as well as a built in floppy drive which makes it interesting to interface to other vintage hardware or to read / create floppy disks for use with other machine.
One thing I don‘t like is the keyboard for its spongy feel. As such, this machine will not be my go to writing device although I typed most of this article on it. The built in trackball though is very nice, runs smoothly and precisely.
PowerBook 145B Overview
| This PowerBook 145B | Original Spec | |
| CPU | – same – | Motorola 68030@25MHz, no FPU |
| Memory | 6MB | 4MB, soldered on CPU card expandable up to 8MB via proprietry module |
| Fixed Disk | 120MB SCSI | 80 or 120MB SCSI 2.5″ |
| Removeable Media | – same – | 3.5″ High Density |
| Video | – same – | 640×400 1bit mono, 9.8″ passive matrix LCD |
| Audio | – same – | 8bit mono, built in speaker, headphone and mic jack |
| System Software | 7.5.5 | Original 7.1, supports up to 7.6.1 |
| Released in | 1993, refresh of 1992 PB 145 | |
| Price at release | USD 2,350 (w. 120M disk and modem) ~ USD 4,962 in 2023 |
Sources and references
PowerBook 145B Technical Data: https://support.apple.com/kb/sp144
PowerBook 145B Troubleshooting Tips: https://repair.wiki/w/Powerbook_145B
PowerBook 145B Service Manual
ThinkPad 350 Wiki Article: https://en.wikipedia.org/wiki/IBM_ThinkPad_350
Page Visits: 59487